HTML Basics
Video Summary
Creating A New HTML Page
You create new HTML pages like you create new word or text files. If you aren't already on a blank page, start on one by clicking file->new. All you have to do to make it a webpage is save it as an HTML file. The easiest way to do this is to just put ".html" at the end of the name. There are a few important things to be aware of when naming HTML files:
- Keep the names as simple as possible. Never use spaces or capitals, because you have to match them later and it is the source of many errors
- You must never use symbols. Using a # in a page name will break the entire thing.
- Nothing can come after the ".html" extension. Make sure you file isn't saved as "name.html.txt" or it will not work.
If you are using Replit, you can create a new HTML page by simply clicking "new file" and giving it a name
HTML Tag Format
Remember from last week that when a browser displays an HTML document, it formats it according to the HTML "tags", or instructions, that you include in the file. A browser determines that a line of code is an HTML instruction by checking if it is enclosed in angle brackets. For example, a tag we used last week was the header tag h3, which was used to create a heading on the page. It looked something like this:
<h3>HTML Tag Format</h3> ^-- opening tag ^-- closing tag
In order for an HTML tag to function properly, it must follow these rules:
- The instruction must be surrounded by angle brackets. There can't be a space between the opening bracket and the tag name
- There is an opening tag at the beginning of each HTML instruction
- Closing tags, which tell the instruction to stop, have a slash between the bracket and tag name. Not every tag has a closing tag
- Tags should be written in lower case letters or they may not function properly on certain browsers
- Tags can go within other tags, which is called "nesting tags." It is important to open and close them in the correct order, or you may get unpredictable results. Consider them like parenthesis in math
HTML Tag Attributes
Sometimes a tag needs more information to do what it is meant to. We provide information to an HTML tag through attributes, which take the following form:
<tag_name attribute_name="attribute_value"> ... </tag_name>
In order for an attribute to function properly, it must follow these rules:
- Attributes must be written in the opening tag. They can appear in any order as long as they are after the tag name
- They are written in the form name="value". The quotation marks are extremely important for ensuring attributes work correctly
- Attributes can only change tags that recognize them. For example, you can't change the font size of an image
- Attributes will only accept certain values. For example, you can't change the width of an image to green
Last week we used the following tag to add a stylesheet to our page:
<link rel="stylesheet" type="text/css" href="default.css">
rel, type, and href are all attributes, and stylesheet, text/css, and default.css are the associated values. We'll learn more about attributes next week.
Basic Tags
There are far too many HTML tags to cover in one course. Below is a list of basic HTML tags that you will get you started. For a more complete list, see the FAQ page here
| Tag | Description |
|---|---|
| Document Tags | |
| <!DOCTYPE html> | Should always be the first line in your file. Not technically an HTML tag at all. This is an XML Document Type Definition (DTD) that tells your browser what type of HTML you are using, so that it doesn't have to guess. When it guesses, it often does it wrong and introduces undesirable behaviour. DTDs are different for different versions of HTML. This one says we are using HTML5. |
| <html> . . . </html> | Indicates the start and end of the HTML Code. This will always be the first tag you open and the last tag you close. |
| <head> . . . </head> | Indicates the start and end of the file "head". If we think of HTML as a person, we have the head that contains the "thoughts" of the page,
known as the "metadata", and should go on top right after the html tag. The head contains information and tags that don't actually appear on the website, but influence it in some way. For example, the tag used to attach a stylesheet should go in the head tag. You do not see the actual stylesheet, but it changes all the style of the page |
| <body> . . . </body> | Indicates the beginning and end of the body. The body should appear after the head, and contains the actual
content of the page, such as the writing, links, and images.
Content that you expect to see in the main part of the browser window should all be between the body tags. |
| <!-- ... --> | Indicates a comment in the XHTML file. The browser ignores anything in between these characters. It is useful for leaving reminders for yourself later. |
| Metadata Tags (go in head section) | |
| <title> . . . </title> | Displays a title line in the browser's title bar. The title is also suggested as the document's favorite or bookmark
name. The title is perhaps the most confusing tag, because you might expect it to place a title on the page itself. Remember that it changes the tab name, not the content. If you ever forget to close the title tag, your entire webpage will go blank because all of what you wrote will become part of the tab name. |
| <link rel="relationship" href="URL" /> | Links other resources to this document. You will use it to link to style sheets, but it can be used for other
purposes. The two attributes shown are:
|
| Grouping Flow Tags (go in body section) | |
| <h1> . . . </h1> | The largest heading. By default they add a bit of space above and below to separate the header from surrounding content. Headings also make the text bolder and larger. How large depends on the type of heading, which can be between 1 and 6 |
| <h6> . . . </h6> | The smallest heading. Remember that the number determines the size of the header, not the order the items appear on the screen |
| <p> . . . </p> | Marks the beginning and ending of a paragraph. By default it separates the paragraph from other content by adding a bit of space above and below. |
| Text-level Flow Tags | |
| <strong> . . . </strong> | Encloses word(s) that should appear strong or stand out. By default it makes the text look bold. It supersedes the older <b> or bold tag. |
| <em> . . . </em> | Encloses word(s) to be emphasized. By default it makes the text look italic. It supersedes the older <i> or italic tag. |
| <u> . . . </u> | Encloses word(s) to be underlined. You should avoid it because it is easy to confuse with the default link style. |
| <br> or <br /> | Indicates new line i.e. start the text at the beginning of the next line. Note that there is nothing inside this tag and it is the opening a closing tag all rolled into one. |
Lab Exercise
For this exercise, create a new file named testing.html in your replit Lab 2 folder.
You are going to try out some of the tags from the table above:
- First, open and close a set of <html> tags. Leave plenty of space in between them
- Open and close a <head> tag under the <html> tag
- Add the <title> tag within the <head> tags. Write something simple like "tab name" and close the title on the other side with </title>. Remember, if you forget to close this tag you will have no website.
- Add a link tag with the attributes rel="stylesheet" and href="testing.css". Right now, this page doesn't exist: we will make it in the next section
- Add the <body> tag under the head tag, and close it just above where you closed the <html> tag
- To add a title onto the page itself, you will use a header tag h. We'll start with the largest, <h1>. Open the <h1> tag, write "Largest header", and close it after with </h1>
- To compare sizes, we'll use the smallest header <h6> next. Open an <h6> tag, write "Smallest Header", and close it with </h6>
- Lastly, let's compare both headers to a standard paragraph tag. The paragraph does not have a number, because all paragraphs are the same size. Open a paragraph tag with <p>, write "This is a paragraph", and close it with </p>
When you are done, you should have a page that looks like this:
<html> <head> <title> Tab Name </title> <link rel="stylesheet" href="testing.css" > </head> <body> <h1> Largest Header </h1> <h6> Smallest Header </h6> <p> This is a paragraph </p> </body> </html>
Remember to view the page to make sure all of your tags are working properly. To view your page, find it in the CS100 folder and open it with a browser. It should look like this:
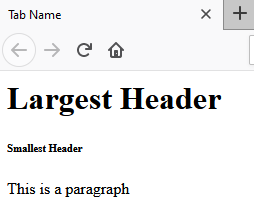
Notice that the tab name at the top was set to tab name by the title tag. The numbers in the header determined the size, not the order: the large one is on top because that is where we placed
it on our editor. The paragraph is a size between 1 and 6, and not bold.
Checking your new page from Replit
Unfortunately. the Replit run function always starts from the index page. Since we don't have our new testing page linked, and we won't learn about links until next week, we have to take an extra few steps to be able to check our work.
- In the top right corner of your preview, click the "open in a new tab" button
- On this new page, go into the address bar. For any page you want to check, write "/pagename.html" behind the address. If we wanted to check our testing.html page, we write "/testing.html"
- Unforunately, there can be a fairly lengthy delay in this page being updated. You may need to refresh your Replit whenever you want to check changes as well

