Checkpoint Two
This checkpoint will build off of the pages we were using last week. Don't worry about overwriting them - it won't affect your marks
Video Summary
Instructions
Use your same folder of files we used for Lab 1 to complete checkpoint #2.
There are four parts to this exercise:
- Create a new page named "check2.html" and place a table on it. After this step you should have your files named exactly this:
- Change the break tag lists on "practice.html", where the list of your favourites will be made into an ordered list and the list of checkpoints will be a definition list
- Add the link to a stylesheet to all your pages
- Submit the checkpoint
Part 1: Create a new page and place a table on it
For this part, you will create a new page named "check2.html". It is important that you name it exactly this, because you won't learn to link it until next week. This means the marker needs to know the exact name to find it.
Remember, to create a new page go file -> new, file -> save as, and then give it the name "check2.html".
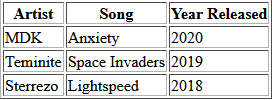
This page Should also include a <head> section where you have to put a <title> tag and a <body> section where you put your table. On this page, you will create a table with four rows and three columns about your favourite music:
- The first row should use th tags. The first cell will say "Artist" or something similar. The second will say "Song" or something similar. The third will say "Year Released".
- Each row under this should use td tags, and have one artist, one song from that artist, and the year it came out. You should have three different musicians, one in each row
When you are finished, the table could look something like this (your table does not need to have borders):
Part 2: Change the lists on practice.html
Last week, you made some lists using br tags on your practice.html page. This week:
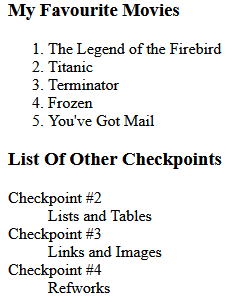
- Change the list of your favourite movies to an ordered list. Remember, to do this you will need to:
- open one <ol> tag above the list, and close it below
- open and close a set of <li> tags around each item in the list
- Change the list of checkpoints into a definition list. To do this you will need to:
- open one <dl> tag above the list, and close it below
- open a set of <dt> tags around each of checkpoint #2, checkpoint #3, and checkpoint #4
- under each definition term, you will need to add its definition. Add these definitions between a set of <dd> tags. The definitions are:
Lists and Tables
Links and Images
Refworks
When you are done, your lists could look something like this:
Part 3: Add a link to a stylesheet to your pages
All we want you to do for this part is add a link to a stylesheet to your practice.html page and your check2.html page. We don't care what stylesheet you use, or what the colours are. If you would like to just use the default stylesheet, just add this link:
<link rel="stylesheet" type="text/css" href="default.css">
When you are finished, all of your pages should have a background colour and font colour. Make sure the pages are readable.
Part 4: Submission
To submit on URcourses,
Make sure all of your deliverable files are in a .zip (compressed) folder to submit. Then you can drag and drop the .zip folder into the URcourses submissions box.