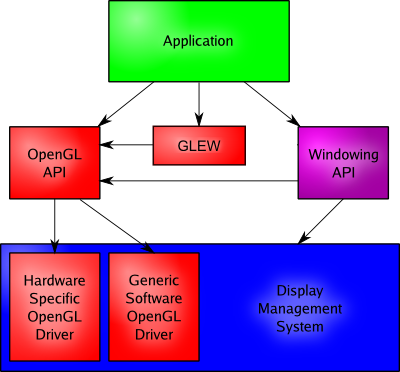
Block Diagram of Typical Application / OpenGL / OS interactions.
This lab is an introduction to OpenGL programming. You will see:
Block Diagram of Typical Application / OpenGL / OS interactions.
Object-oriented programming was developed, in part, to aid with modularising the components of Model-View-Architecture programs. Most user interface APIs are written in an Object Oriented language.
You will be structuring your programs to handle these three aspects of an interactive program. A 3D graphics:GLUT is the cross platform programming library of choice for this course. Follow these instructions to learn how to set up a GLUT OpenGL program on the Macs in the lab. You will be given the opportunity to learn how to move the same code to Windows or Linux as part of your take home exercise.
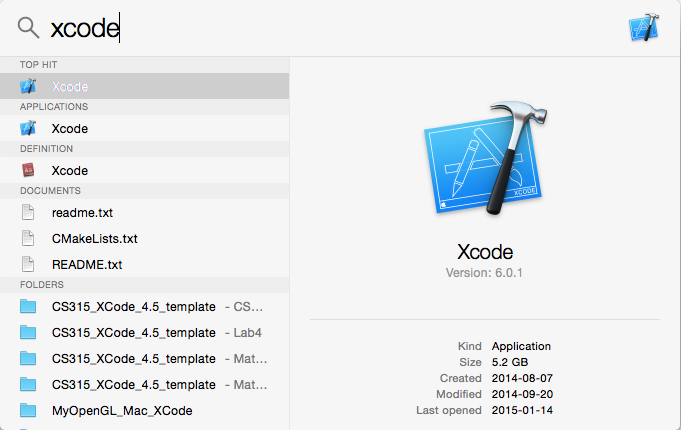
Before starting these instructions make sure you have a Mac running Mountain Lion, and that you have installed XCode 4.6.2 and the 3rd party GLEW framework. You can find links to instructions for installing the GLEW framework on a Mac, or for configuring and using Windows and Linux PCs below the lab schedule. Windows and PC users should
![]()
You will see a Welcome screen
similar to this one:
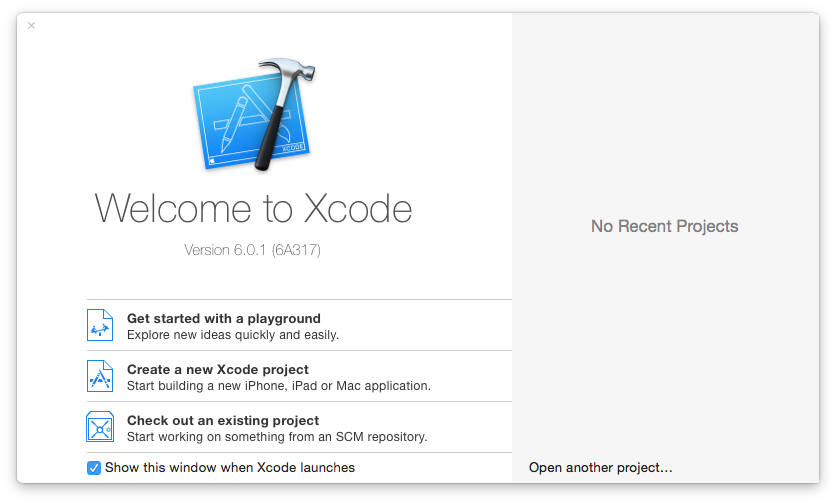
This screen is useful, so please leave the "Show this window when Xcode launches" box checked.
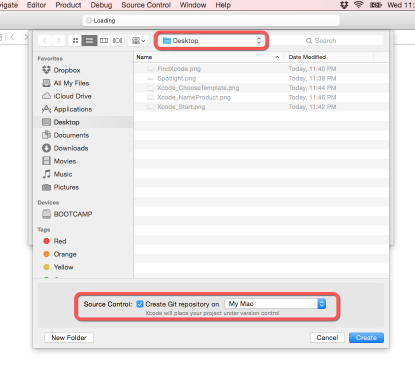
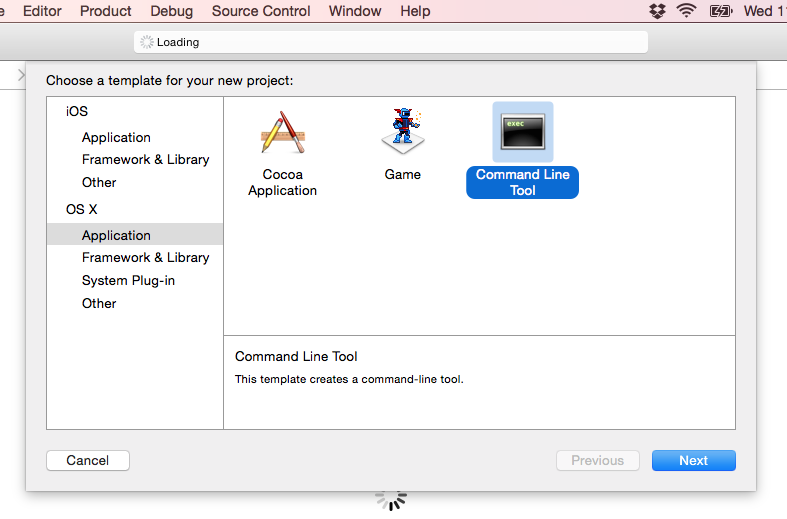
The following will show you how to create a framework for the OpenGL viewing class. You will need to perform the following steps.
At this point, you have created a project to manage the OpenGL program workspace window with multiple areas, panes and bars. The following map is from the Xcode User Guide, which is available through the help menu.
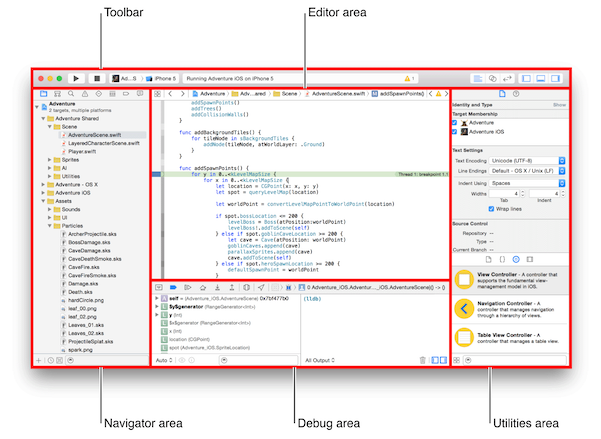
Click here for a brief tour of the workspace.
Click here for Apple's Xcode Basics Help to learn even more about Xcode
You should read through the tour and try the things suggested there. At a minimum find main.cpp, read it and run it. The program doesn't do much - it's just a Hello World app.
You may not see all the panes or areas yet. They can be shown or hidden. Some may reveal themselves when you perform certain actions.
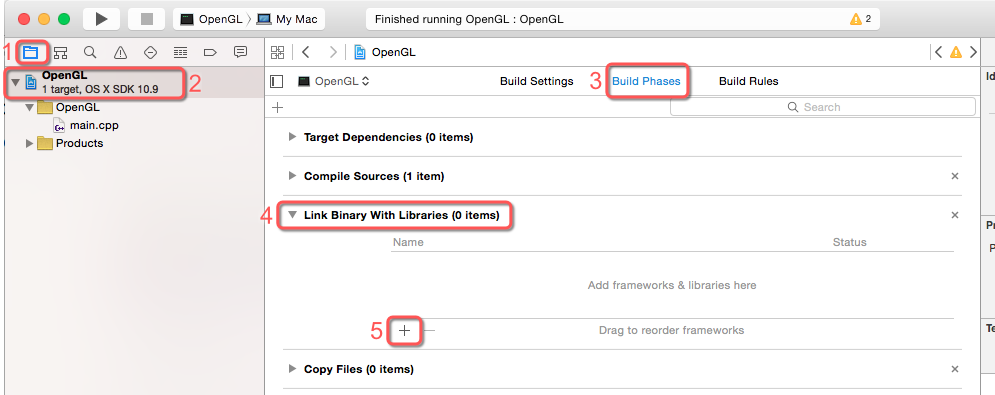
In MacOS X, libraries are stored as packages called Frameworks. A framework encapsulates related headers, objects and documentation.
And that's it. By adding frameworks you have added include and link paths for the desired libraries with ease.
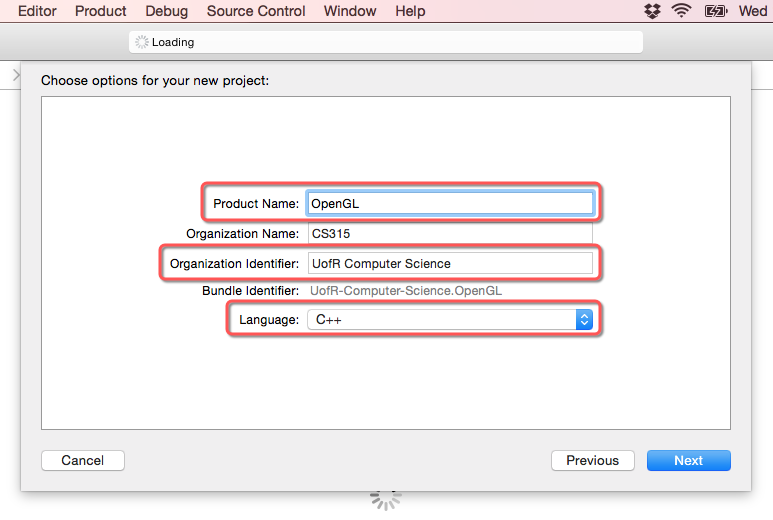
The XCode Project Wizard creates the minimum code necessary to run a program. For our project we are creating a GLUT application and GLUT will handle setting up windows. Later you will make a native Mac or Windows application. The basic app will have enough code to show you an empty window.
You have already set up your project with the necessary libraries, so
replace the code in your main.cpp with the following:
// CS315 GLUT Template
#include "Angel.h"
//--- Headers, Prototypes and Global Variables -------------------------------
void init ( void );
void display ( void );
void reshape (int w, int h);
void keyboard ( unsigned char key, int x, int y );
//--- Main -------------------------------------------------------------------
int main( int argc, char **argv )
{
glutInit( &argc, argv );
glutInitWindowSize( 512, 512 );
#ifdef __APPLE__
glutInitDisplayMode( GLUT_3_2_CORE_PROFILE | GLUT_RGBA | GLUT_DOUBLE | GLUT_DEPTH );
#else
// If you are using freeglut, the next two lines will check if
// the code is truly 3.2. Otherwise, comment them out
glutInitContextVersion( 3, 2 );
glutInitContextProfile( GLUT_CORE_PROFILE );
glutInitDisplayMode( GLUT_RGBA | GLUT_DOUBLE | GLUT_DEPTH );
#endif
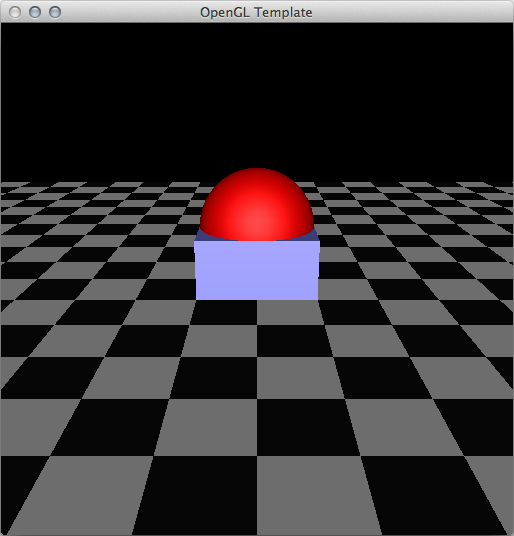
glutCreateWindow( "OpenGL Template" );
glewExperimental = GL_TRUE;
glewInit();
init();
//Register callback functions
glutDisplayFunc( display );
glutKeyboardFunc( keyboard );
glutReshapeFunc(reshape);
glutMainLoop();
return 0;
}
//--- Support functions ------------------------------------------------------
// OpenGL initialization
void init()
{
//Put Call to OpenGL Initializing function here
}
//----------------------------------------------------------------------------
void display( void )
{
// Put Call to main Drawing function here
glutSwapBuffers();
}
void reshape (int w, int h)
{
//Put Call to Size Changing function Here
}
//----------------------------------------------------------------------------
void keyboard( unsigned char key, int x, int y )
{
switch( key ) {
case 033: // Escape key
case 'q': case 'Q':
exit( EXIT_SUCCESS );
break;
}
}
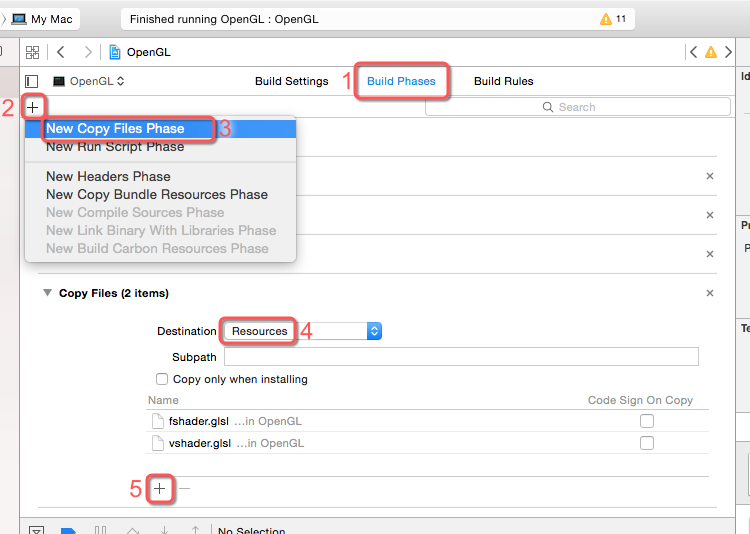
Unfortunately, this program is not complete. You can compile and run the program, and you could even do some simple drawing, but most of the the OpenGL code we use in this class also depends on some external files.
Tip: add an existing file by saving it into your project folder next to main.cpp, then in XCode select the group with main.cpp in it, right click, and choose Add Files to "project name".... Files already in your project are greyed out for your convenience.
You can now safely build and run your program. Note, however, that there are no OpenGL calls in the template. You will get a raw OpenGL window - it won't even be cleared for you so it may be filled with junk from unitialized memory or from the Mac OS X compositor which also uses OpenGL.
To run one of Dr. Angel's examples, go to his Windows code and replace your main.cpp with one of his .cpp files, then replace your shaders with the shaders that match it.
OpenGL is set up and controlled by GLUT in this program. You will use GLUT throughout the semester for your assignments. If you need to know the details of a GLUT function mentioned in the notes, or if you want to browse the available functions to learn new features, you can look at the official online GLUT manual.
The GLUT functions in the template take care of the basics of setting up an OpenGL drawing environment by:
You will learn more about how to do these things throughout the semester. For now, copy the following code to appropriate places in main.cpp and refer to the in-line comments for details.
// uofrGraphics library for CS315 Labs
// defines urgl object which can draw some simple shapes
/////////
#include "uofrGraphics.h"

// Window Event helpers
/////////

//Init
void InitializeOpenGL();

//Resize
bool ChangeSize(int w, int h);

//Draw
void Draw( void );
void PreRenderScene( void );
void RenderStockScene( void );
void RenderScene( void );
void drawSolidSphere(GLfloat radius, GLint slices, GLint stacks);
void drawSolidCube(GLfloat size);


//OpenGL State Management
////////
GLuint program1;  //Shader
GLint uColor;     //Shader color input
GLint uLightPosition;//Shader light position input
GLint mvIndex;    //Shader positioning input
GLint projIndex;     //Shader projection input
mat4 p, mv;       //Local projection and positioning variables


// Scene Related Functions and Variables
////////

//Model Control Variables
GLfloat rotY = 0;    //rotate model around y axis
GLfloat rotX = 0;    //rotate model around x axis
//Function: InitializeOpenGL
//Purpose:
//    Put OpenGL into a useful state for the intended drawing.
//    In this one we:
//        - choose a background color
//        - set up depth testing (Requires GL_DEPTH in Pixel Format)
//        - turn on the lights
//        - set up simplified material lighting properties
//        - set an initial camera position
void InitializeOpenGL()
{
   //Set up shader
   program1 = InitShader( "vshader.glsl", "fshader.glsl" );

   glUseProgram( program1 );

   //Get locations of transformation matrices from shader
   mvIndex = glGetUniformLocation(program1, "mv");
   projIndex = glGetUniformLocation(program1, "p");

   //Get locations of lighting uniforms from shader
   uLightPosition = glGetUniformLocation(program1, "lightPosition");
   uColor = glGetUniformLocation(program1, "uColor");

   //Set default lighting and material properties in shader.
   glUniform4f(uLightPosition, 0.0f, 0.0f, 10.0f, 0.0f);
   glUniform3f(uColor, 1.0f, 1.0f, 1.0f);

   //Configure urgl object in uofrGraphics library
   urgl.connectShader(program1, "vPosition", "vNormal", NULL);

   glEnable(GL_DEPTH_TEST);
}
// Function: ChangeSize
// Purpose:
//     Tell OpenGL how to deal with a new window size.
// Arguments:
//     int w, h: new width and height of the window, respectively.
bool ChangeSize(int w, int h)
{
   GLfloat aspect_ratio; // width/height ratio

   //Make sure the window size is valid
   if ( 0 >= w || 0 >= h )
   {
      return false;
   }

   // tell OpenGL to render to whole window area
   glViewport(0, 0, (GLsizei) w, (GLsizei) h);

   // compute the aspect ratio
   // this is used to prevent the picture from distorting when
   // the window is resized
   aspect_ratio = (GLdouble)w/(GLdouble)h;

   // calculate a new projection matrix
   p = Perspective(50.0f, aspect_ratio,  0.5f, 20.0f);

   // send the projection to the shader
   glUniformMatrix4fv(projIndex, 1, GL_TRUE, p);

   return true;
}
// Function: Draw
// Purpose:
//     Control drawing of the scene. To be called whenever the window
//     needs redrawing.
void Draw()
{
    // Clear the screen and the depth buffer
    glClear( GL_COLOR_BUFFER_BIT | GL_DEPTH_BUFFER_BIT );

    PreRenderScene();
    RenderStockScene();
    RenderScene();
}


// Use this to perform view transforms or other tasks
// that will affect both stock scene and detail scene
void PreRenderScene()
{
    // select a default viewing transformation
    // of a 20 degree rotation about the X axis
    // then a -5 unit transformation along Z
    mv = mat4();
    mv *= Translate( 0.0f, 0.0f, -5.0f );
    mv *= RotateX ( 20.0f );

    //Allow variable controlled rotation around local x and y axes.
    mv *= RotateX(rotX);
    mv *= RotateY(rotY);
}


// Function: RenderStockScene
// Purpose:
//     Draw a stock scene that looks like a
//     black and white checkerboard
void RenderStockScene()
{
    const GLfloat delta = 0.5f;

    // define four vertices that make up a square.
    vec4 v1(  0.0f, 0.0f,  0.0f, 1.0f);
    vec4 v2(  0.0f, 0.0f, delta, 1.0f);
    vec4 v3( delta, 0.0f, delta, 1.0f);
    vec4 v4( delta, 0.0f,  0.0f, 1.0f);


    int color = 0;

    // define the two colors
    vec3 color1( 0.9f,  0.9f,  0.9f );
    vec3 color2( 0.05f, 0.05f, 0.05f );

    mat4 placementX = mv;
    mat4 placementZ;
    placementX *= Translate( -10.0f * delta, 0.0f, -10.0f * delta );
    for ( int x = -10 ; x <= 10 ; x++ )
    {
        placementZ = placementX;
        for ( int z = -10 ; z <= 10 ; z++ )
        {
            glUniform3fv(uColor, 1, (color++)%2 ? color1 : color2 );
            glUniformMatrix4fv( mvIndex, 1, GL_TRUE, placementZ );
            urgl.drawQuad(v1, v2, v3, v4);
            placementZ *= Translate( 0.0f, 0.0f, delta );
        }
        placementX *= Translate( delta, 0.0f, 0.0f );

    }
}

// Function: RenderScene
// Purpose:
//     Your playground. Code additional scene details here.
void RenderScene()
{
    // draw a red sphere inside a light blue cube

    // Set the drawing color to red
    // Arguments are Red, Green, Blue
    glUniform3f(uColor, 1.0f, 0.0f, 0.0f);

    // Move the "drawing space" up by the sphere's radius
    // so the sphere is on top of the checkerboard
    // mv is a transformation matrix. It accumulates transformations through
    // right side matrix multiplication.
    mv *= Translate( 0.0f, 0.5f, 0.0f);

    // Rotate drawing space by 90 degrees around X so the sphere's poles
    // are vertical
    mv *= RotateX( 90.0f );

    //Send the transformation matrix to the shader
    glUniformMatrix4fv(mvIndex, 1, GL_TRUE, mv);

    // Draw a sphere.
    // Arguments are Radius, Slices, Stacks
    // Sphere is centered around current origin.
    urgl.drawSolidSphere(0.5f, 20, 20);


    // when we rotated the sphere earlier, we rotated drawing space
    // and created a new "frame"
    // to move the cube up or down we now have to refer to the z-axis
    mv *= Translate(0.0f, 0.0f, 0.5f);

    //Send the transformation matrix to the shader
    glUniformMatrix4fv(mvIndex, 1, GL_TRUE, mv);

    // set the drawing color to light blue
    glUniform3f(uColor, 0.5f, 0.5f, 1.0f);

    // Draw the cube.
    // Argument refers to length of side of cube.
    // Cube is centered around current origin.
    urgl.drawSolidCube(1.0f);
}
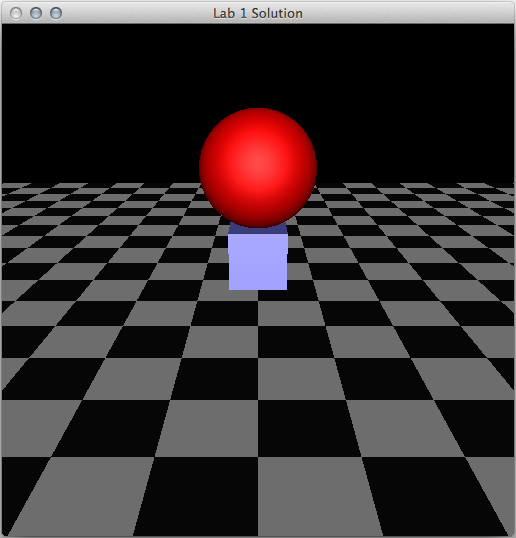
Once you have added all this, go back to main.cpp, add code to the GLUT event callback functions to call the appropriate helpers, then run your program to see what is displayed.
It should look like this:
Good luck!
If your program runs correctly, you might be wondering how exactly the picture is drawn. That is, you might want to understand how each function works. Well, you do not have to worry too much about this in the first lab. Over the rest of the semester we will go through these subjects one-by-one in detail. Of course, we will learn a lot of more advanced functions and features.
Tip: Only after you have called the initialization function will you know whether your shaders are being copied. If you get complaints about vshader.glsl or fshader.glsl in the output pane, go back and fix it.
It's a good idea to backup your project before you leave. You can copy your work to a USB drive or your Hercules account. If you use an IDE such as XCode or Visual Studio you must exit it before doing a backup or you will be unable to copy some of your files. Remember to save all the documents before quitting.
Copy the entire project folder. This folder can be a bit large. To save space you might want to delete build products and support files as they can be rather large. Don't worry - you will get it back the next time you compile your program. All the source files should be small enough to put on a floppy disk.
The project should be up and ready to go, just as you left it.
To be completed and submitted to URCourses by the first midnight one week after the lab.
Try to make some simple changes to the scene. For help with the function calls refer to the Official Online OpenGL Manual.
You probably have a clear idea of what OpenGL is, but you may be confused about all the libraries used in this lab's program. Take a moment to learn about them.
Now that you have created a GLUT based OpenGL program on a Mac, demonstrate that OpenGL+GLUT+GLEW is a cross platform API by compiling and running your program with a different operating system. You will find Visual Studio specific set up information the CS 315 lab schedule page. The brave may attempt to do this on Linux or other UNIX-like OS.