Click the little computer above for a detailed description.
Lab exercises can be conducted using Replit, Visual Studio, or any preferred C++ IDE. Replit, an online IDE supporting multiple languages including C++, can be accessed at replit.com. While Replit offers advantages such as AI coding assistance, it also has limitations: it is dependent on internet access, allows a maximum of three active projects, and limits usage to 600 minutes per month.
The CS210 lab projects are already set up, so there is no need to modify the .replit file. Clicking the run button compiles only from a file named main.cpp. If you are using a different main file, you need to add a .replit configuration file for it to work. See the image below for reference. Click the three dots next to the files, choose Show hidden files. The .replit file shoould be visible, enter the commands needed to compile multiple files.

Right click on these files and click "save link as" or "save target as" (depending on your browser). The files you need for Linked list can be downloaded here:
The files: LinkedList.cpp, LinkedList.h, and main.cpp
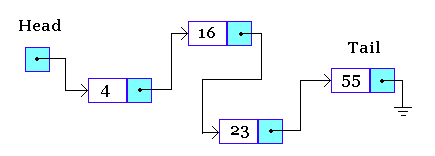
A linked list is a data structure that strings together a collection of nodes. Each node typically contains a data item and a pointer to the memory address of the next node in the list. This means that the list must be travelled in order, or sequentially, from front to back, starting at a special node called the head, and there is no way to travel backwards through the list. Here is a graphical representation of a linked list:
A linked list typically has the following functions:
     First, create a node initialized with a data value and a NULL pointer.
               Set the "head" to point to the first node.
               Set up a current-pointer to the first node (or "head").
               Get a data value for the next node.
               While more nodes to add
               {
                  Create a new node initialized with the data value and a NULL pointer.
                  Set the current-pointer link member ("next") to the new node.
                  Set the current-pointer to point to the new node.
                  Get a data value for the next node.
               }
     //Find the end of the list...
               Set a current-pointer to the "head".
               While current-pointer link member ("next") is not NULL
               {
                  Set the current-pointer to the "next" node in the list.
               }
               //Now current-pointer points to the last node...
               Create a new node initialized with the "item" and a NULL pointer.
               Set the current-pointer link member ("next") to this new node.
   Set a current-pointer to the "head".
               While current-pointer is not NULL
               {
                   Print the data member ("datum") of the current node
                   Set the current-pointer to the "next" node in the list.
               }
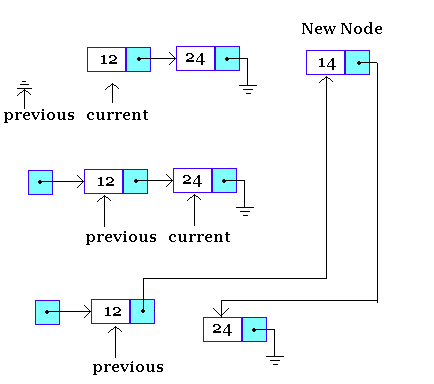
     Set a previous-pointer to NULL.
               Set a current-pointer to the "head".
               //Find where your want to insert into the list...
               While the new data member > current-pointer value
               {
                  //Move both pointers along in the list...
                  Set the previous-pointer to the current-pointer
                  Set the current-pointer to the "next" node in the list.
               }
               Create a new node initialized with the "item" and current-pointer.
               Set the link member in the previous_pointer to the new node.
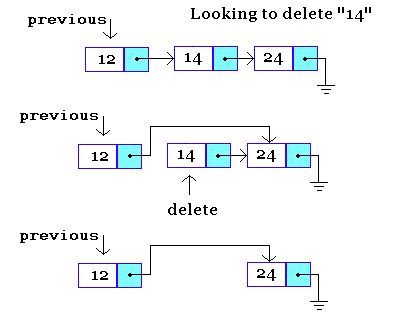
          If "item" is in the first node
               {
                   Set a delete-pointer to the first node.
                   Change the "head" pointer to the second node.
                   Delete the node indicated by delete-pointer
               }
               Else
               {
                   Set a previous-pointer to the "head".
                   While previous-pointer->next is not equal to NULL and
                         previous-pointer->next->datum is not equal to "item"
                   {
                      Set the previous-pointer to the "next" node in the list.
                   }
                   If you have not reached the end of the list
                   {
                      Set a delete-pointer to the node to be deleted (Note: it is
                          the node after previous-pointer).
                      Set the link member ("next") of the previous-pointer to the
                          "next" node after delete-pointer.
                      Delete the node indicated by delete-pointer.
                   }
                   Otherwise, print a "not found" message
               }
If you want to use Visual Studio, download files here:
The files: LinkedList.cpp,LinkedList.h, and main.cpp
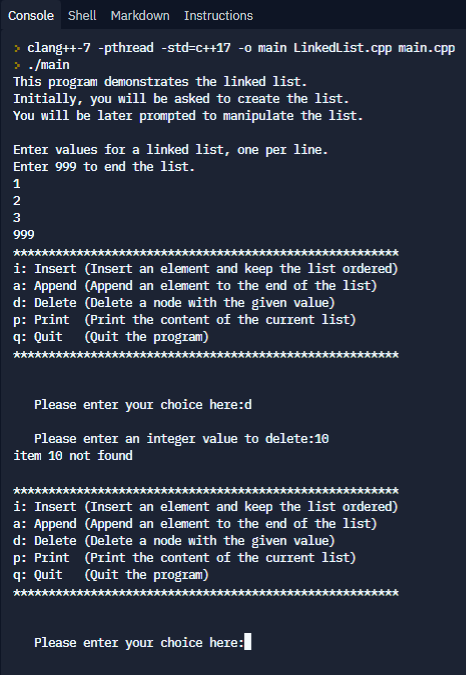
When you are finished, your program should be able to delete items from the list, or provide an error message when the item is not found. Your program must not crash or core dump when the item is not found.
Example output:
|
|
|