In this lab, we do not look at any new hardware; the focus is entirely on software. We will implement a series of lights as an array and learn how to use for loops and functions with arrays.
It would be a really good idea to build this circuit before going to the lab because it is somewhat time consuming to connect all of the wires.
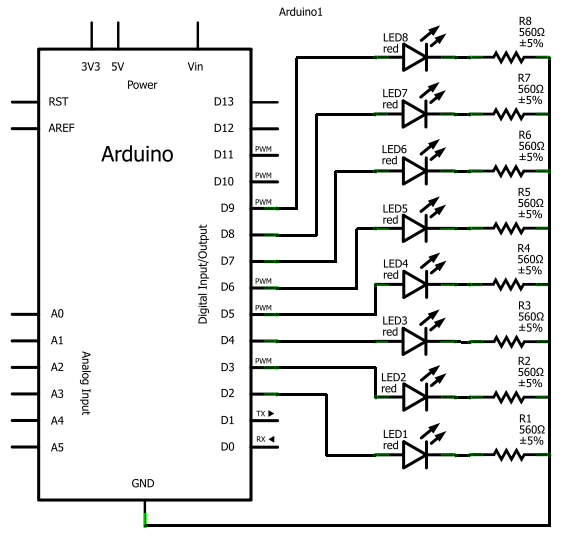
The circuit here is CIRC-02, from your book. For formality, the schematic when attached to the Arduino, looks like this:
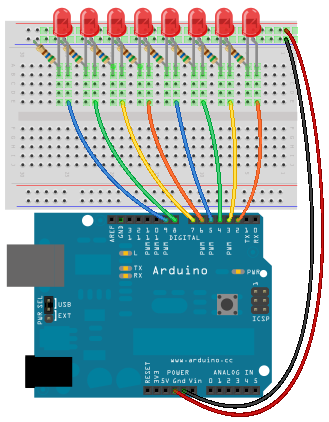
The breadboard will look like this:
Please note the following details:
The full code for this circuit is available here: CIRC02-code.txt
You can use Command-a to select everything, Command-c to copy from your browser window, and Command-v to paste it into your Arduino window.
The code should look like this (although, some parts are missing). The focus of this excerpt is the code that runs immediately on the board:
    /*     ---------------------------------------------------------
    *     |  Arduino Experimentation Kit Example Code             |
    *     |  CIRC-02 .: 8 LED Fun :. (Multiple LEDs)              |
    *     ---------------------------------------------------------
    *
    *  A few Simple LED animations
    *
    * For more information on this circuit http://tinyurl.com/d2hrud
    *
    */

   //LED Pin Variables
   int ledPins[] = {2,3,4,5,6,7,8,9}; //An array to hold the pin each LED is connected to
                                      //i.e. LED #0 is connected to pin 2, LED #1, 3 and
                                      //so on to address an array use ledPins[0] this
                                      //would equal 2 and ledPins[7] would equal 9

   /*
    * setup() - this function runs once when you turn your Arduino on
    * We the three control pins to outputs
    */
   void setup()
   {

     //Set each pin connected to an LED to output mode (pulling high (on) or low (off)
     for(int i = 0; i < 8; i++){   //this is a loop and will repeat eight times
         pinMode(ledPins[i],OUTPUT);  //we use this to set each LED pin to output
      }                               //It replaces 8 pin mode commands!

   }


   /*
    * loop() - this function will start after setup finishes and then repeat
    * we call a function called oneAfterAnother(). if you would like a different behaviour
    * uncomment (delete the two slashes) one of the other lines
    */
   void loop()                     // run over and over again
   {
     oneAfterAnotherNoLoop();   //this will turn on each LED one by one then turn each off

   }

   /*
    * oneAfterAnotherNoLoop() - Will light one LED then delay for delayTime then light
    * the next LED until all LEDs are on it will then turn them off one after another
    *
    * this does it without using a loop which makes for a lot of typing.
    * oneOnAtATimeLoop() does exactly the same thing with less typing
    */
   void oneAfterAnotherNoLoop(){
     int delayTime = 100; //the time (in milliseconds) to pause between LEDs
                          //make smaller for quicker switching and larger for slower
     digitalWrite(ledPins[0], HIGH);  //Turns on LED #0 (connected to pin 2 )
     delay(delayTime);                //waits delayTime milliseconds
     digitalWrite(ledPins[1], HIGH);  //Turns on LED #1 (connected to pin 3 )
     delay(delayTime);                //waits delayTime milliseconds
     digitalWrite(ledPins[2], HIGH);  //Turns on LED #2 (connected to pin 4 )
     delay(delayTime);                //waits delayTime milliseconds
     digitalWrite(ledPins[3], HIGH);  //Turns on LED #3 (connected to pin 5 )
     delay(delayTime);                //waits delayTime milliseconds
     digitalWrite(ledPins[4], HIGH);  //Turns on LED #4 (connected to pin 6 )
     delay(delayTime);                //waits delayTime milliseconds
     digitalWrite(ledPins[5], HIGH);  //Turns on LED #5 (connected to pin 7 )
     delay(delayTime);                //waits delayTime milliseconds
     digitalWrite(ledPins[6], HIGH);  //Turns on LED #6 (connected to pin 8 )
     delay(delayTime);                //waits delayTime milliseconds
     digitalWrite(ledPins[7], HIGH);  //Turns on LED #7 (connected to pin 9 )
     delay(delayTime);                //waits delayTime milliseconds

   //Turns Each LED Off
     digitalWrite(ledPins[7], LOW);  //Turns on LED #0 (connected to pin 2 )
     delay(delayTime);                //waits delayTime milliseconds
     digitalWrite(ledPins[6], LOW);  //Turns on LED #1 (connected to pin 3 )
     delay(delayTime);                //waits delayTime milliseconds
     digitalWrite(ledPins[5], LOW);  //Turns on LED #2 (connected to pin 4 )
     delay(delayTime);                //waits delayTime milliseconds
     digitalWrite(ledPins[4], LOW);  //Turns on LED #3 (connected to pin 5 )
     delay(delayTime);                //waits delayTime milliseconds
     digitalWrite(ledPins[3], LOW);  //Turns on LED #4 (connected to pin 6 )
     delay(delayTime);                //waits delayTime milliseconds
     digitalWrite(ledPins[2], LOW);  //Turns on LED #5 (connected to pin 7 )
     delay(delayTime);                //waits delayTime milliseconds
     digitalWrite(ledPins[1], LOW);  //Turns on LED #6 (connected to pin 8 )
     delay(delayTime);                //waits delayTime milliseconds
     digitalWrite(ledPins[0], LOW);  //Turns on LED #7 (connected to pin 9 )
     delay(delayTime);                //waits delayTime milliseconds
   }
There is nothing new for hardware. You have seen it all before: LED's, resistors, and the Arduino. The code is the highlight of this lab! Get ready-the code is next.
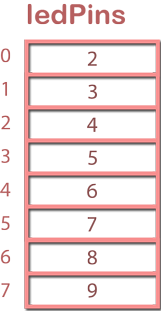
The following table compares an integer (from previous labs) to an array of integers.
| Integer | Array of Integers | |
|---|---|---|
| Declaring and Initializing | int ledPin=13; |
int ledPins[] = {2,3,4,5,6,7,8,9}; |
| Pictorial Representation | 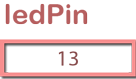 |
 |
| Using | digitalWrite(ledPin, HIGH); |
|
Notice that in the declaration of an array:
int ledPins[] = {2,3,4,5,6,7,8,9};
[] ) after the ledPins. This is the way of indicating that we want to set aside contiguous (i.e. one after another) spaces of memory. We could also write the following to specify that we want to set aside eight spaces:int ledPins[8] = {2,3,4,5,6,7,8,9};int ledPins[]=...), the compiler will know how many spaces are needed based on how many values we have.When we want to use ledPins, we have to remember that there are now eight spaces of memory (or eight values) associated with ledPins. We need a way of specifying which one of those eight spaces we want to access. This is where the indices (displayed on the left-hand side of the pictorial representation) are used. We put the index in square brackets after "ledPins".
For instance, if we want the value 8, we would write in the code:
ledPins[6]
Some questions:
ledPins[0] contain?ledPins[7] contain?Remember that for loops allow you to have a variable (maybe i) that starts at 0 and is incremented by 1 until it reaches a maximum (let us say 8). You should be thinking, "Wow, we can use for loops to control our index into the array". The for loop would look like this:
for(int i = 0; i < 8; i++)
You will notice that in the code that you copied into your Arduino window, there are a couple of places where for loops are used. The following is one usage (in setup()):
       for(int i = 0; i < 8; i++){         //this is a loop and will repeat eight times
         pinMode(ledPins[i],OUTPUT);     //we use this to set each LED pin to output
     }
If you look inside the function: oneAfterAnotherLoop() you will find a couple of other similar usages of the for loop.
Try to predict what each of the following functions do:
oneOnAtATime(); inAndOut();Try running these functions by uncommenting them (i.e. delete the two slashes in front of them)!
To see the function running on its own, you might want to comment out all of the other function calls in loop().
In the code that you are playing around with this week, you might want to specify a pattern for the LEDs. The pattern could be defined in an array containing values of HIGH and LOW. For instance, if you would like every second LED to be turned on, the "pattern" array would be:
int pattern[] = {HIGH,LOW,HIGH,LOW,HIGH,LOW,HIGH,LOW};
The code to turn the LEDs on or off in this pattern would be:
  for (int i=0; i<8; i++)
     {
       digitalWrite(ledPins[i], pattern[i]);
     }
     delay(3000);
Remember that ledPins were defined as:
int ledPins[] = {2,3,4,5,6,7,8,9};
Each cycle through the for loop will turn on (if HIGH) or off (if LOW) the LED starting at pin 2 and ending at pin 9 to yield the overall pattern at the end of the loop.
To take a look at the entire code for this example, click here.
So, you could have a couple of patterns and switch between one pattern and the next. If you have more than just a couple of patterns to switch between, your code will get longer than you might want it to be.
The next progression would be to send the pattern to a function. This will reduce the number of for loops that are necessary in your code to get the patterns to work. The following is some code which alternates between two patterns.
   //LED Pin Variables
   int ledPins[] = {2,3,4,5}; //An array to hold the pin each LED is connected to

   int pattern1[] = {HIGH,LOW,HIGH,LOW};
   int pattern2[] = {LOW,HIGH,LOW,HIGH};

    /* setup() - this function runs once when you turn your Arduino on
    * We the three control pins to outputs
    */
   void setup()
   {

     //Set each pin connected to an LED to output mode (pulling high (on) or low (off)
     for(int i = 0; i < 4; i++)
     {
         pinMode(ledPins[i],OUTPUT);
     }
   }


   /*
    * loop() - this function will start after setup finishes and then repeat
    */
   void loop()                     // run over and over again
   {
     makePattern(ledPins, pattern1, 4);
     makePattern(ledPins, pattern2, 4);
   }

   /*
    * makePattern - this function has three parameters:
    *   leds[]-an array of output pins connected to LEDs
    *   pattern[]-an array containing HIGH or LOW to indicate whether an LED is on or off
    *   num-the number of LEDs
    */
   void makePattern(int leds[], int pattern[], int num)
   {
     int delayTime = 200;
     for(int i = 0; i < num; i++)
     {
       digitalWrite(leds[i], pattern[i]);
     }
     delay(delayTime);
   }
Notice the function definition:
void makePattern(int leds[], int pattern[], int num)
Notice the call to the function:
makePattern(ledPins, pattern1, 4);
HIGH and LOWPay attention to the difference between the function definition and the call to the function. The function definition needs to have what type of things you are using whereas the call to the function needs only the names of the arrays you want to use.
Some questions:
Create a new function called larsonScanner(). A Larson Scanner looks like this: http://www.youtube.com/watch?v=NPAqGgYpb4A
The idea will be that it is sort of a mixture of the oneAfterAnotherLoop() and the oneOnAtATime() functions.
Inside the new larsonScanner function:
for loops.Create a new call in loop() to the larsonScanner() function.
Modify the code for the makePattern() function, given in the notes above as:
void makePattern(int leds[], int pattern[], int num)
void makePattern(int leds[], int pattern[], int num, int delayT)loop() function, call makePattern to display the four patterns that you have defined