The focus of this lab is on servos. Once you understand servos, you will be able to see that they have wonderful applications for steering! In this lab we will take a look at some sample code that moves a servo arm. We will discuss the functions that we use with a servo and the beauty of a "for" loop. If you are interested, this lab also provides side information on how to use use input devices like your potentiometer or a LEGO Mindstorms Accelerometer to control the servo. Enjoy!
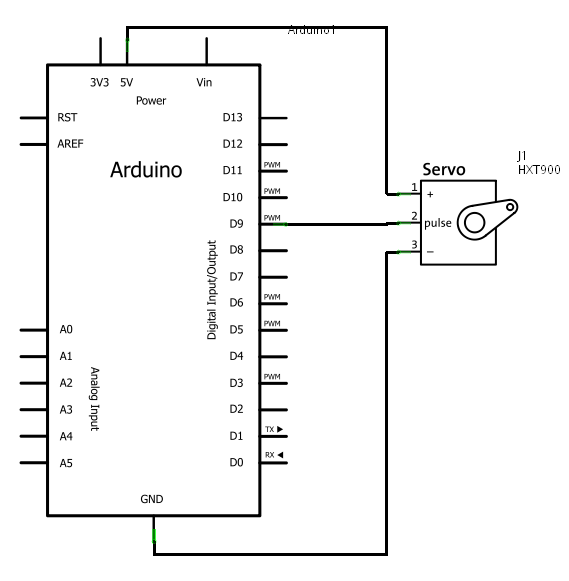
The schematic diagram for the servo looks like this. Be aware though that in reality, the 5V is connected to the middle wire (red).
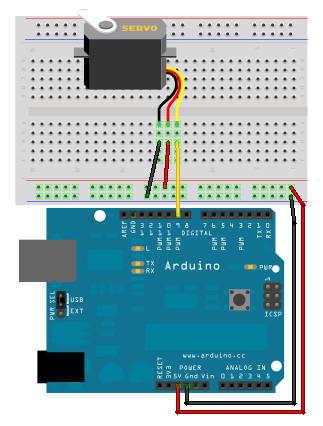
Our breadboard will look like this. Note that on our device, the black wire is brown and the yellow is orange.
To summarize the wires of the servo:
Under the File menu, choose: Examples | Servo | Sweep. The following is what the code should look like:
// Sweep
// by BARRAGAN <http://barraganstudio.com>
// This example code is in the public domain.


#include <Servo.h>

Servo myservo;  // create servo object to control a servo
                // a maximum of eight servo objects can be created

int pos = 0;    // variable to store the servo position

void setup()
{
  myservo.attach(9);  // attaches the servo on pin 9 to the servo object
}


void loop()
{
  for(pos = 0; pos < 180; pos += 1)  // goes from 0 degrees to 180 degrees
  {                                  // in steps of 1 degree
    myservo.write(pos);              // tell servo to go to position in variable 'pos'
    delay(15);                       // waits 15ms for the servo to reach the position
  }
  for(pos = 180; pos>=1; pos-=1)     // goes from 180 degrees to 0 degrees
  {
    myservo.write(pos);              // tell servo to go to position in variable 'pos'
    delay(15);                       // waits 15ms for the servo to reach the position
  }
}
We will spend some time discussing this new device-the servo! This device is most useful in steering. For instance, controlling the axles of a car, the control surfaces on a plane, or the rudders of a boat.
The first question that you may be asking is: what is the difference between a servo and a motor? There are several differences. Most generally, a motor rotates in circles round and round (useful for spinning a wheel). By contrast, a servo is a controlled placement usually between 0 and 180 degrees (useful for steering).
So what are the nuts and bolts behind the operation of the servo? As you might have noticed, there were three wires going into your servo:
As a note, if you need to drive more than one or two servos, you will probably need a separate power supply (not the 5V pin on your Arduino). (Modified from: http://www.arduino.cc/en/Reference/Servo)
Without getting into too many details of the internal workings of the servo, the "signal" wire (orange on your device) controls the position of the servo arm. The idea is that the servo responds to how long the signal is on. For instance, it checks in a 20 millisecond time period and if the signal is high for 0.45 milliseconds, then the arm is positioned at 0o. The following diagram (modified from https://www.jameco.com/jameco/workshop/howitworks/how-servo-motors-work.html) represents the timings and how the servo arm moves:
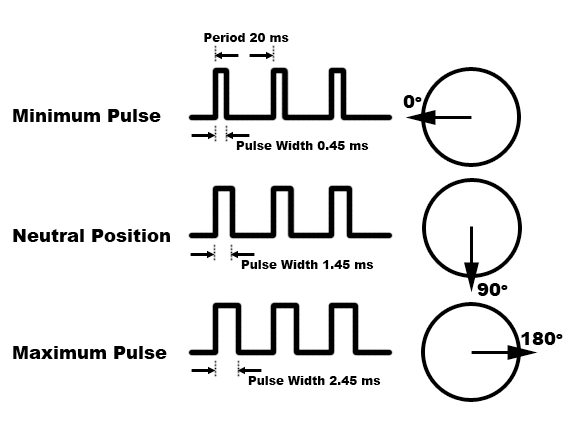
These timings are manufacturer dependent. So, these pulses may work for one servo, but differ for another. Also, other servos may have different angles of rotation. For your reference, the servo in your kit is a Hextronik HXT900 9 gram servo, and its specs are here.
You might think that analog writing, which is also PWM based, would work for servos. Don't do it (http://www.arduino.cc/cgi-bin/yabb2/YaBB.pl?num=1232572239)...Instead use the functions that we will be talking about below.
Last week you learned how to write functions. This week, we will examine special functions associated with servos. Also, we will take a closer look at a "for" loop as a way of repeating things a certain number of times. Let us take a look at the code again:
// Sweep
// by BARRAGAN <http://barraganstudio.com>
// This example code is in the public domain.


#include <Servo.h>

Servo myservo;  // create servo object to control a servo
                // a maximum of eight servo objects can be created

int pos = 0;    // variable to store the servo position

void setup()
{
  myservo.attach(9);  // attaches the servo on pin 9 to the servo object
}


void loop()
{
  for(pos = 0; pos < 180; pos += 1)  // goes from 0 degrees to 180 degrees
  {                                  // in steps of 1 degree
    myservo.write(pos);              // tell servo to go to position in variable 'pos'
    delay(15);                       // waits 15ms for the servo to reach the position
  }
  for(pos = 180; pos>=1; pos-=1)     // goes from 180 degrees to 0 degrees
  {
    myservo.write(pos);              // tell servo to go to position in variable 'pos'
    delay(15);                       // waits 15ms for the servo to reach the position
  }
}
The first thing that you might notice about this code is the following line:
#include <Servo.h>
What this line means is that we will be using a servo library. A
library is a collection of functions bundled together that you can use in
multiple sketches. We don't have to worry about the internal code of these
functions; we just need to know what arguments to use with these functions and
what gets returned from these functions. If you are curious (and brave), you
can look at the code in the libraries directory of your Arduino install directory.
The next line that may also seem unfamiliar is:
Servo myservo;
This line creates a servo object called myservo. A servo
object is responsible for controlling one servo. To use it, you attach it to an
output pin, then you send it commands. You will notice that all of the servo
functions in the example are preceded by the object name (myservo)
and a dot. You can create up to 12 Servo objects on your Arduino Uno. Each
should have a different name that you will need to use with the servo
functions.
Once you have created a servo object, the PWM timers for pins 9 and 10 are no longer available. Those timers are used to automatically send control signals to the servo. You can still use them for a servo, so it's probably a good idea to use them for the first couple of servos you attach.
There are six functions in the Servo library. You can read about them in the libraries section of the arduino reference pages: http://www.arduino.cc/en/Reference/Servo. We will take a look at two of them in the following subsections:
attach()write()In the setup function, you will notice that the attach function is called like this:
myservo.attach(9);
Remember our servo has one "signal" wire (in this lab, going to pin 9). From a general perspective, the attach function hooks the Servo object to the specified pin so that when we perform writes (or reads) the signal will go out to (or be read from) that pin.
The use of the write function in this lab is:
myservo.write(pos);
On our servo, this will set the angle of the shaft (in degrees). The pos is a value from 0 to 180.
Documents/Arduino/libariesSketch/Include Library/Add .ZIP Library... menu 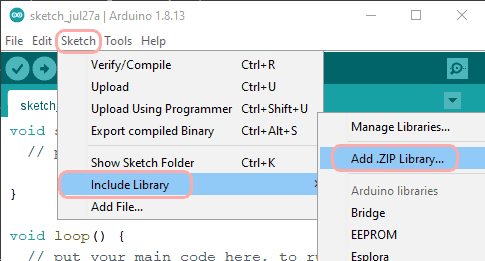
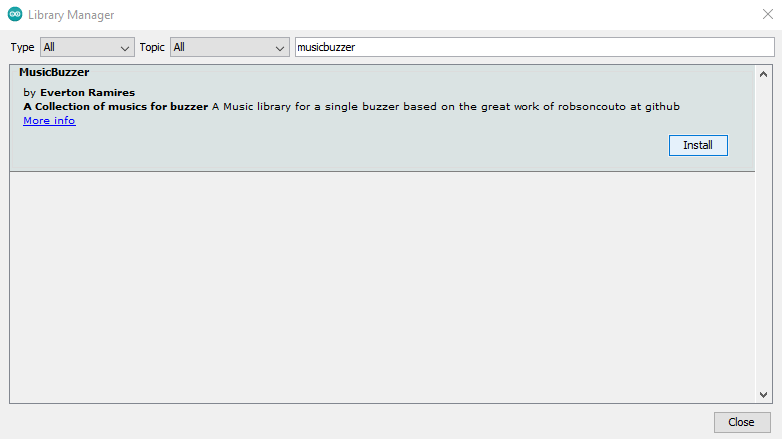
MusicBuzzer library, and am ready to install it.
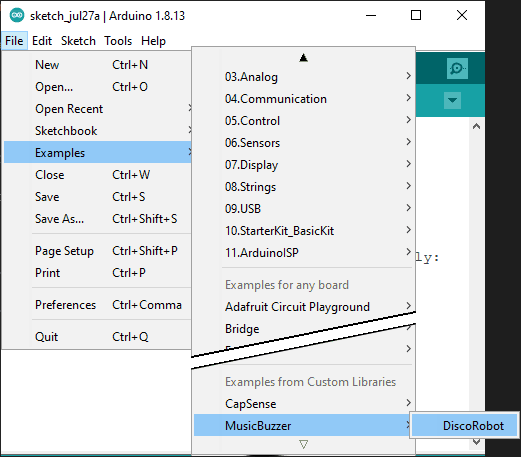
Many libraries contain demos to help you learn how to use them. You will find them in the File/Examples menu near the bottom in the Examples from Custom Libraries section. In this picture you can see the DiscoRobot example that comes with MusicBuzzer.
For more about installing libraries, consult the excellent Arduino Library Guide. If you want to try writing your own libraries, check out the Arduino Library Tutorial
The for loop appears in two places in the servo code:
  for(pos = 0; pos < 180; pos += 1)  // goes from 0 degrees to 180 degrees
  {                                  // in steps of 1 degree
    myservo.write(pos);              // tell servo to go to position in variable 'pos'
    delay(15);                       // waits 15ms for the servo to reach the position
  }
  for(pos = 180; pos>=1; pos-=1)     // goes from 180 degrees to 0 degrees
  {
    myservo.write(pos);              // tell servo to go to position in variable 'pos'
    delay(15);                       // waits 15ms for the servo to reach the position
  }
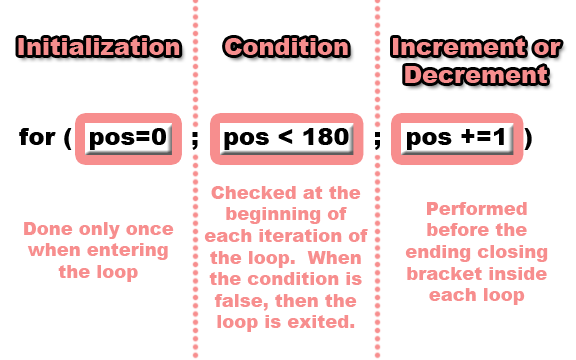
The for loop is typically broken down into three segments:
These three segments are shown encircled in pale red:
Notice:
pos+=1 is equivalent to writing pos=pos+1The for loop is a very handy structure. As an overview, the above statement informs you (when you get used to it) that the pos variable will start at 0 and be incremented by 1 until it reaches 180. The purpose of the entire loop is to control the servo so that it starts a 0o and moves to 179o. Why only 179o?
By contrast, where does the following loop start and end?
for(pos = 180; pos>=1; pos-=1)
For those of you who are really excited about servos, we have provided an additional page of information about using a potentiometer and an accelerometer/tilt sensor to drive the servo. Click here!
The first exercise focuses on on what is most important in this lab:
for loopIn the original sweep sketch, the servo swings from side to side from 0 to 180 then 180 to 0. Your lab instructor should have modified that sketch with you so that it can sweep out angles centered on 90. You are going to extend that idea so that the servo starts sweeping 90 degrees to either side of 90, from 0 to 180 and back to 0, then 80 degrees to either side (10 to 170 and 170 to 10), then 70 degrees on either side (eg. 20 to 160 and 160 to 20) and so forth until it is stops in the middle at 90 degrees. After a short pause there, it should restart
(4 Marks) To do this, you will add a for loop around the two existing for loops to control the size of the sweeping angle. The new for loop will have the three segments:
When you are done, the original two for loops should initialize the position variable for the servo and check that position in such a way that they depend on the angle set by new for loop.
Give it a whirl!
(2 Marks)If you followed the instructions above carefully exactly, you'll get the right idea, but it might be a bit jerky on one side. For full marks, see if you can get it swinging smoothly by making the end of the second loop line up with the start of the first loop a little better.
For part 2, we want you to get a little experience managing libraries. This can help a lot with your project!
MusicBuzzerMusicBuzzer/DiscoRobot sample.Control the speed of your increments/decrements using the input from the potentiometer or LEGO Mindstorms Accelerometer as shown in the Extensions section of the notes.
Manually install and demonstrate usage of this library of functions from Lab 5: CS207_Lib.zip
Modify the lab instructor's library from the Intermediate challenge by adding a unit conversion function of your choice, adding keywords for it and providing an example program.
MusicBuzzer library and demonstrate the song of your Lab Instructor's choice.