Every student recieves a Novell computer account as long as you a student at the University.
You will need the Novell account to do the following:
Check your U of R email regularly.
Click this link to Check your email.
Any files you store on the local machine will only be available on that machine. If you plan to use them on another machine, copy them to a USB drive or your network account.
File permissions on stored files are too permissive - all files are world readable. See the section on Finder/File Management in macenviron.html to learn how to secure your data.
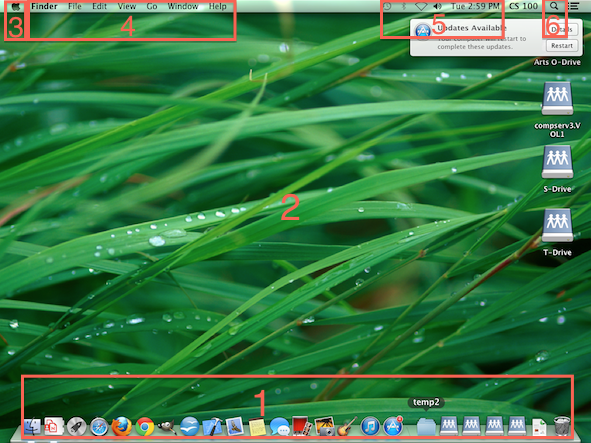
When you first login, your desktop will look like this:
There are several ways to start programs:
A light colored dot under a program's icon in the dock indicates that the program is running.
There's usually only one command menu in Mac OS X. It is at the top of the screen and it is controlled by the active program.
You can switch between active programs by clicking their icon in the dock, clicking a window that belongs to that program, or by using Command-Tab. This key sequence may seem similar to the Windows Alt-Tab that switches windows, but it is different. It switches Applications. If an application has no windows, or they are all minimized you will switch to it and the only indicator will be the menu bar. If an application has multiple windows and they are not all minimized, you will only switch to the last one you used.
On a Mac, windows have three buttons in the upper left corner. The red one closes the window, the yellow one minimizes the window, and the green one "zooms" the window. The meaning of "zoom" depends on the program. In iTunes it switches between player and music manager modes. In Safari it selects a window width and height that is large enough to optimally display the current page. In Firefox it maximizes the window as a Windows user would expect.
Mac applications have traditionally had multiple mini windows with no application container. If you have many applications running with many windows each, the desktop can get very cluttered looking. You can clean it up by hiding other programs.
If you want to stop a running program It is not enough to close its windows. The program will stay in memory waiting for you to use it again. Instead you must quit the program in one of three ways:
If you would like more information about the Mac Environment, including customizations, see macenviron.html.
"Arduino is an open-source electronics prototyping platform based on flexible, easy-to-use hardware and software. It's intended for artists, designers, hobbyists, and anyone interested in creating interactive objects or environments". (from http://arduino.cc/en/).
Arduino can use sensors ( for instance, temperature, tilt, and light) to test the environment and can control lights, motors, sound, and more. In later labs, you will get an opportunity to try out these things.
The goal of this lab will be to make a light on the Arduino blink. To get there, you need to know:
The following two sections will discuss the hardware and the software.
As mentioned earlier, Arduino consists of two major parts: the hardware (the Arduino board) and the software (the IDE). Let us consider hardware:
Not too long ago, working on hardware meant building circuits from scratch, using hundreds of different components with strange names like resistor, capacitor, inductor, transistor, and so on.
Every circuit was "wired" to do one specific application, and making changes required you to cut wires, solder connections, and more.
With the appearance of digital technologies and microprocessors, these functions, which were once implemented with wires, were replaced by software programs.
Software is easier to modify than hardware. With a few keypresses, you can radically change the logic of a device and try two or three versions in the same amount of time that it would take you to solder a couple of resistors.
(page 19 of Getting Started with Arduino by Massimo Banzi)
So, we don't have to solder things together. We will temporarily build our circuits on a breadboards and change code to modify how the device responds.
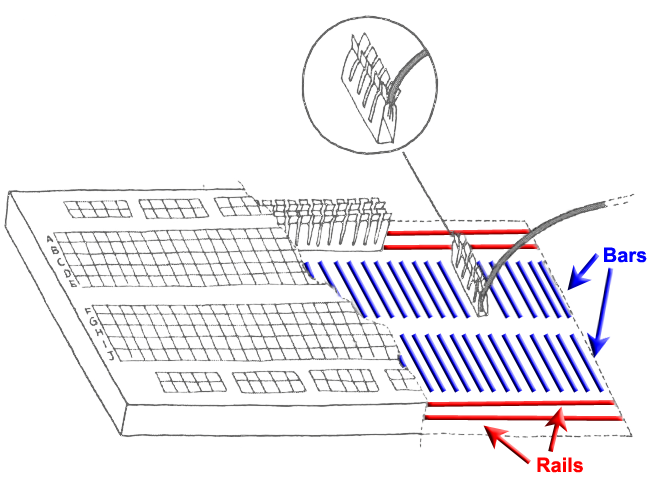
The key to building temporary circuits is a solderless breadboard. The following diagram (modified from page 94 of Getting Started with Arduino) depicts what the breadboard looks like inside (the colors here are not realistic, but meant to aid in describing the underlying pieces).
The thing to note is that there are strips of metal (shown in blue or red) connecting the rows and columns together. Each hole has a spring loaded contact underneath so that when you poke a wire into the hole, a clip grabs onto it.
There are two kinds of metal strips:
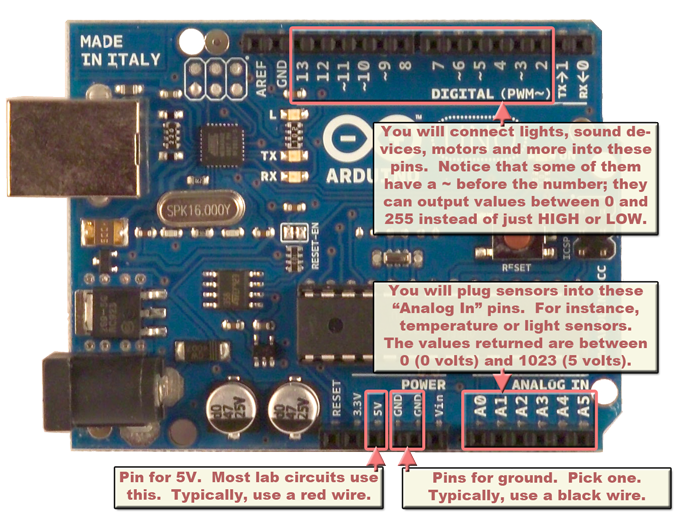
Let us spend a few minutes looking at the board (modified version of the picture taken from http://arduino.cc/en/Main/ArduinoBoardUno)
Throughout this lab you will connect wires to many of the pins encircled in pale red:
As mentioned earlier, Arduino consists of two major parts: the hardware (the Arduino board) and the software (the IDE). We will now learn about the Arduino IDE (A fancy way of saying the application where we will write our code). In a later lab we will examine the code.
The Arduino IDE will now start running.
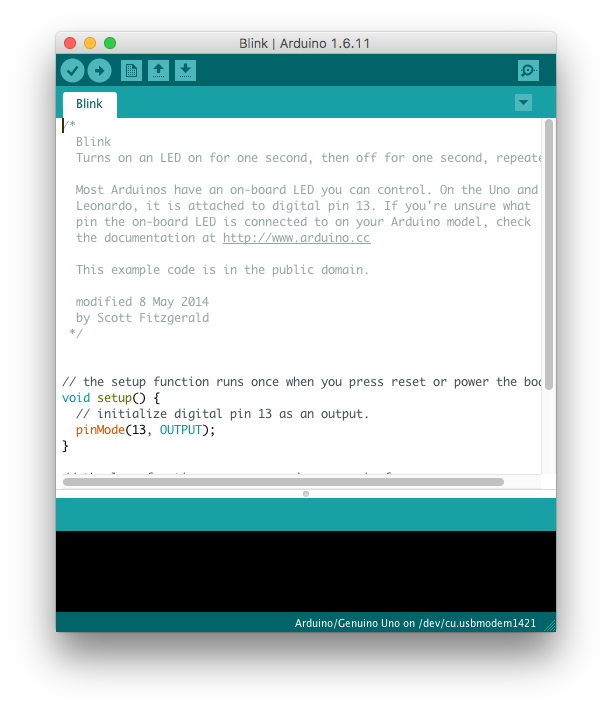
The following diagram demonstrates the areas of the Arduino IDE:
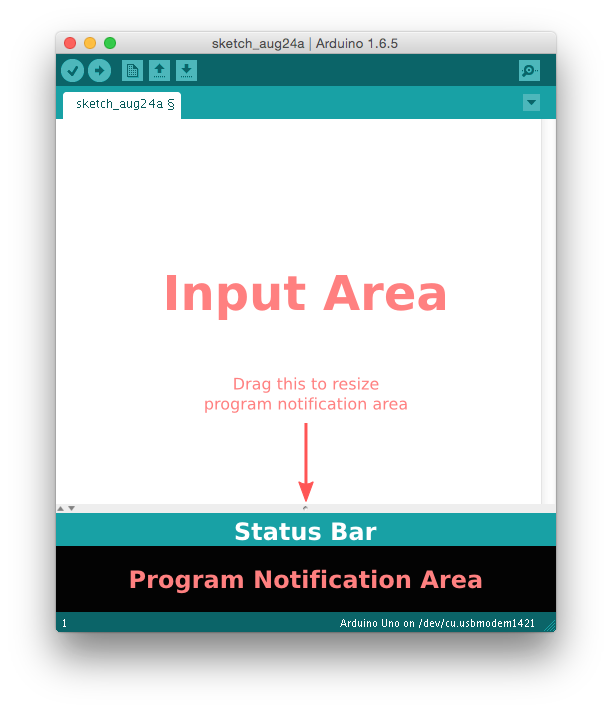
There are three main regions:
At this point, you should plug your Arduino devices into the USB Port for the Mac.
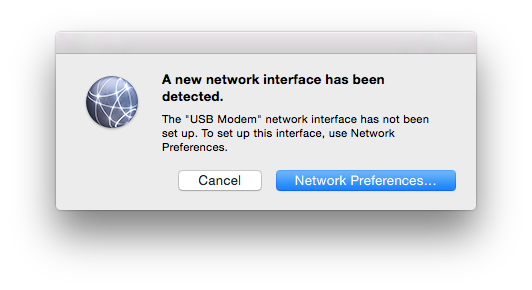
If you get the following message, click Cancel:
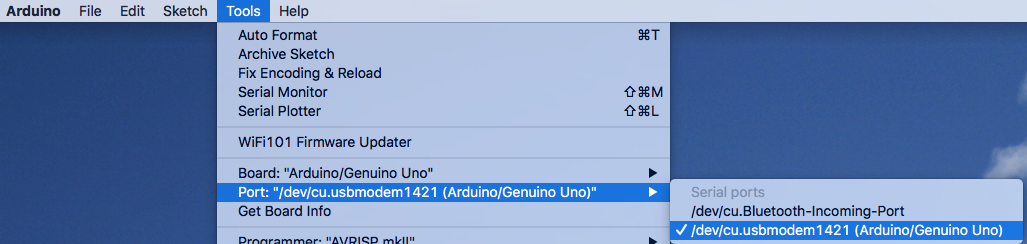
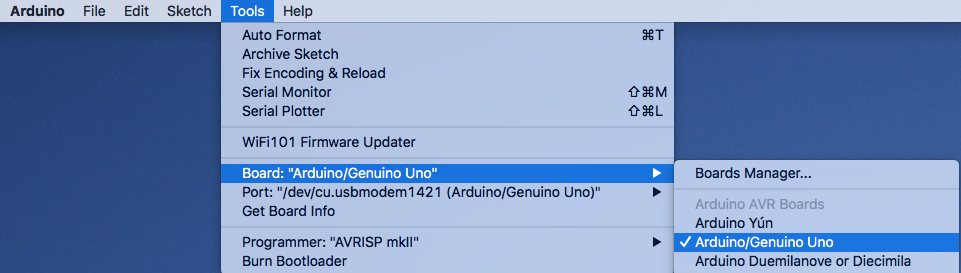
You might have to adjust some settings of the IDE to get Arduino to work on the Mac. The following two diagrams illustrate the settings for the Arduino Uno in the Mac lab:
And now, for the moment that you have been waiting for, let us see something happening.
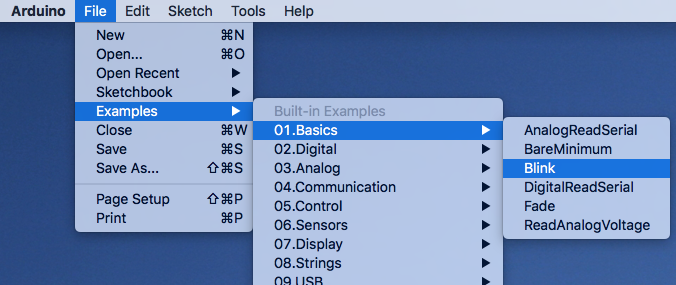
Under the File menu, choose: Examples | Basics | Blink. As shown in the diagram below.
A new window will open with code in the input area. You now have your first sketch, which is a special name that Arduino uses to mean a program, or a unit of code that will be run on the Arduino board (hardware). We will be looking at that code more later.
Let us try running the code:

The below diagram (modified from http://arduino.cc/en/Main/ArduinoBoardUno) illustrates where to look for the lights mentioned above.
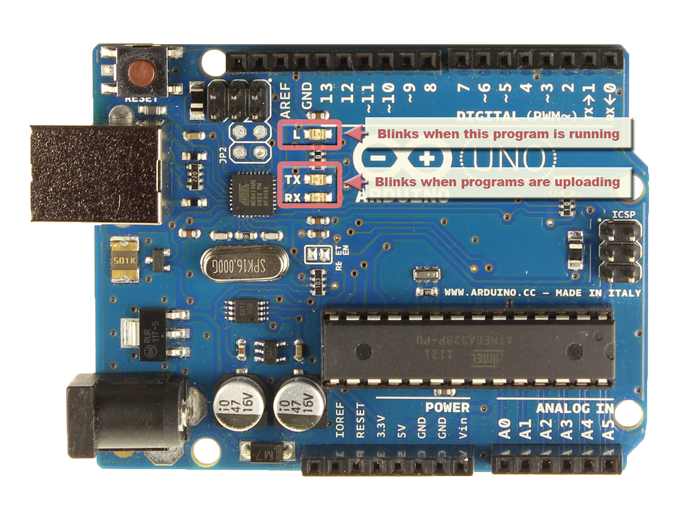
A little more about these lights:
So, you have a light blinking. Next week, we'll learn more. This lab is just meant to introduce you to the Mac environment and Arduino.
It is traditional for programmers to write a "Hello World" program when they start learning something new. Blink is a Hardware "Hello World". Sometimes a blinking light doesn't say much. It's nice to get messages you can read.
Arduino has two printing instruction, and a printing setup instruction. You can see them in use here:
void setup() {
  Serial.begin(9600);  // connect to the serial monitor at 9600 baud
}

void loop() {
  Serial.print("Hello"); // Send the text "Hello" to the serial monitor
                         // and stay on the same line.

  Serial.println(" World"); //Send the text " World" to the serial monitor
                            // and move to the next line
}
Type this sketch into Arduino IDE and upload it. Fix your errors until you get it right. Spelling is very important when you write sketches.
When your sketch is uploaded, press the serial monitor  button to see your message.
There is no official assignment - nothing will be marked. However, to prepare yourself for future labs and class assignments I recommend that you do the following:
More instructions are included on page 03 of your "Experimenter's Kit for Arduino":