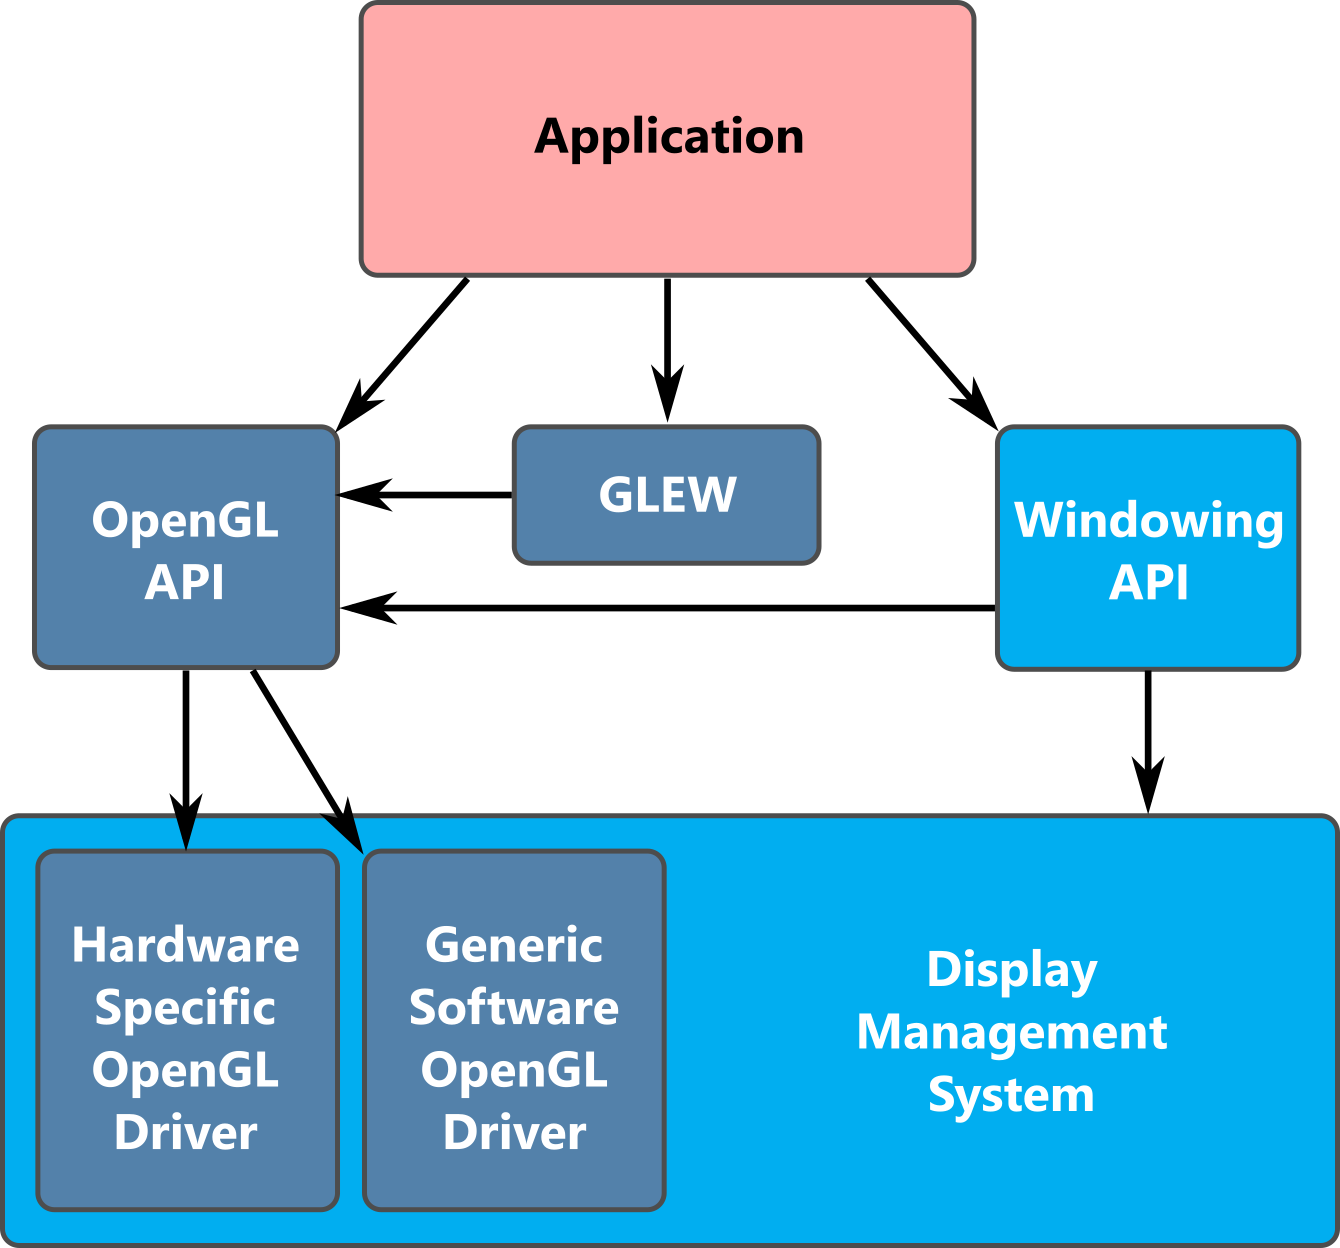
Block Diagram of Typical Application / OpenGL / OS interactions.
This lab is an introduction to WebGL programming. You will see:
Block Diagram of Typical Application / OpenGL / OS interactions.
OpenGL is the definitive cross-platform 3D library. It has a long history. It inspired Microsoft's Direct3D (D3D) API, and both evolved together from supporting fixed function graphics accelerators to supporting modern programmable hardware. The modern OpenGL style, and the one most like recent versions of D3D, is known as Core Profile. A similar set of features is available for mobile devices as OpenGL ES. OpenGL ES 3.0 is used as the basis for WebGL 2, which we will be learning in this class.
By learning WebGL2, you will learn a low level graphics programming style that is common to all modern OpenGL flavours. Especially if you stick to the same programming language, switching between versions is not too hard, and porting code can be easy if you modularize properly.
Getting to the point where you can begin writing OpenGL code is a bit trickier as the process differs from operating system to operating system. Fortunately there are cross platform libraries that can make your code extremely simple to port. The above diagram shows the general case for getting a modern "Core" OpenGL environment. Regardless of how you choose to set up :
When you write a WebGL program, many of these details are hidden from you. In fact, your WebGL calls may not even be executed by an OpenGL driver. On Macs, where OpenGL support is built-in to the OS, WebGL calls are translated directly into their OpenGL equivalents. On Windows, DirectX/D3D 9 or better has been built-in to the OS since Vista, so a special layer called ANGLE — developed by Google specifically for WebGL and used by Chrome, Firefox, IE11 and Edge — is used to translate WebGL API commands into equivalent D3D9 or D3D11 commands. On Linux, driver support is EXTREMELY important — most browsers only support nVidia's official drivers.
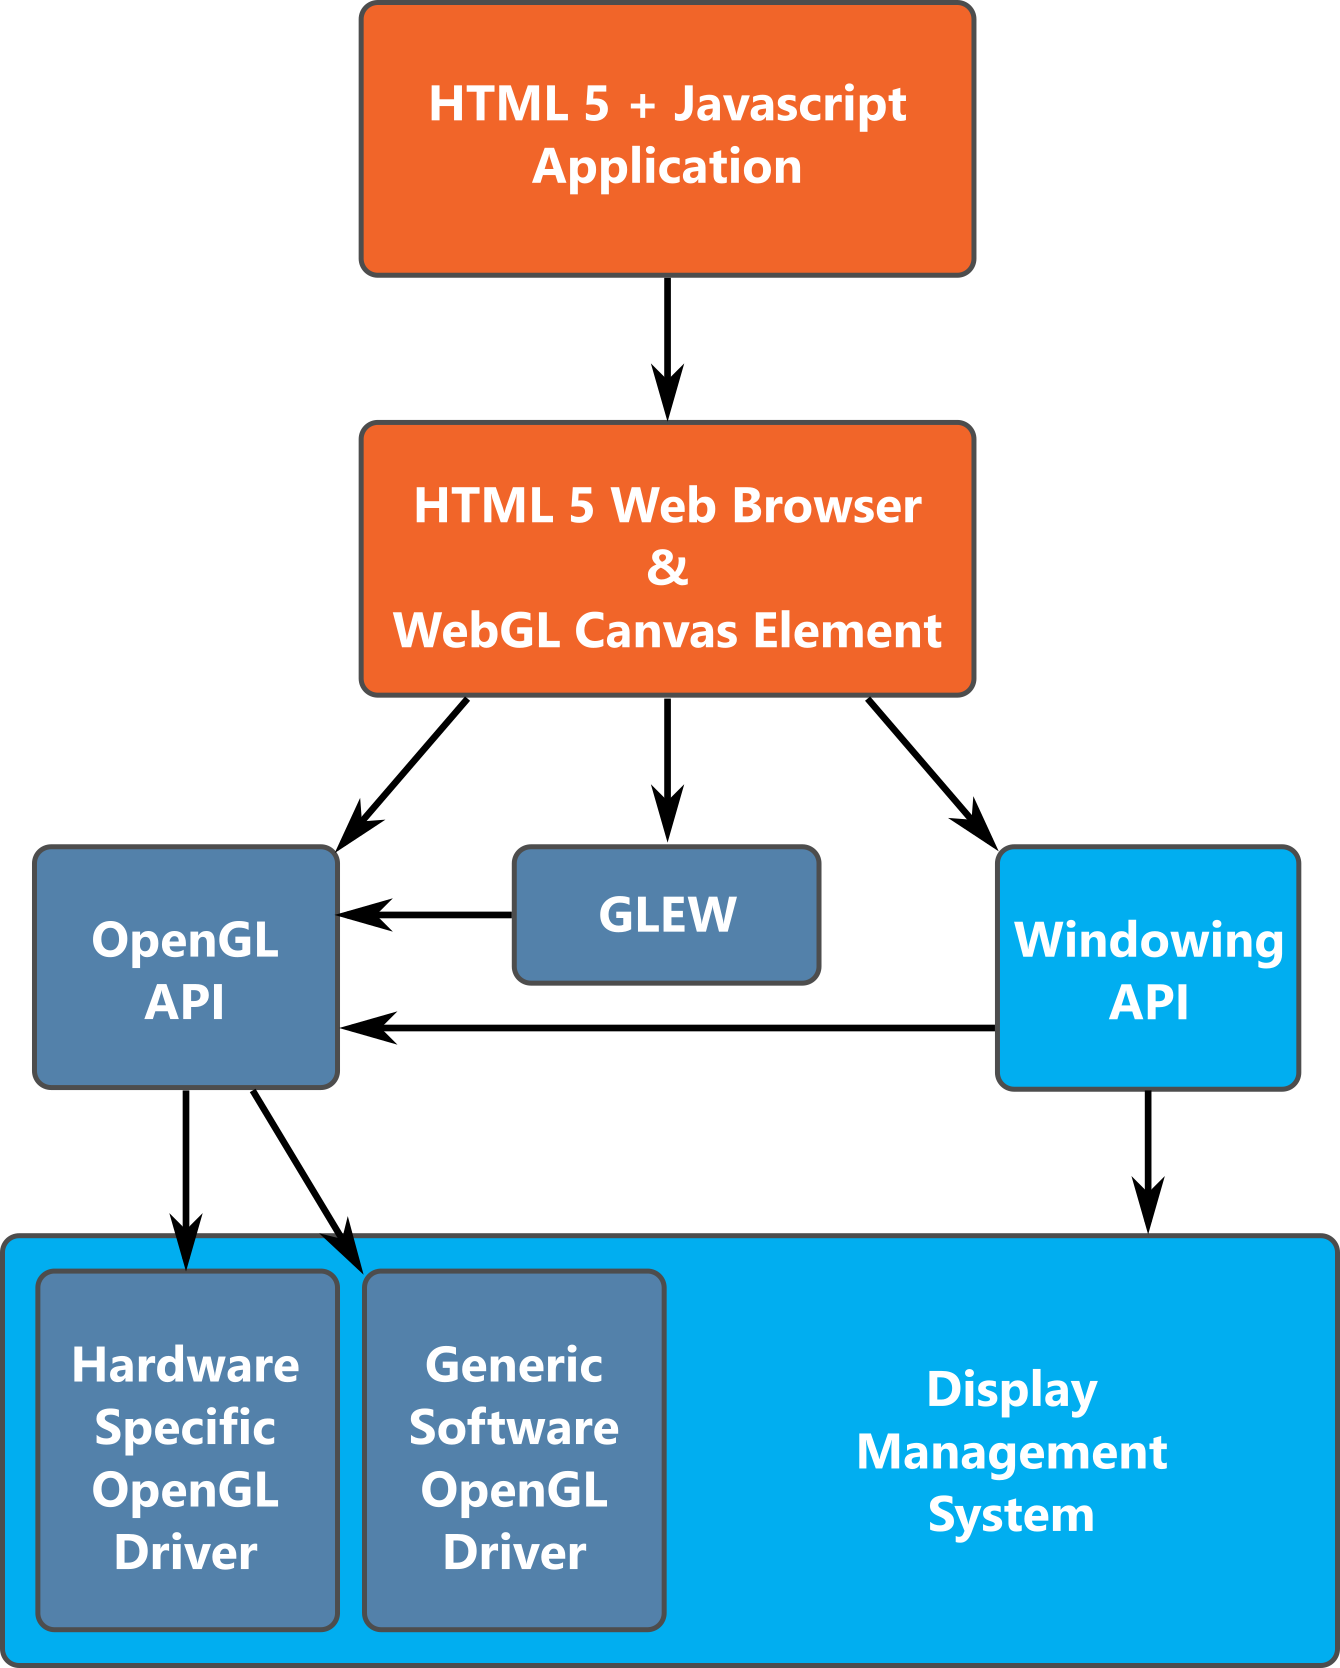
"Ideal" WebGL Application / OpenGL / OS interactions. |
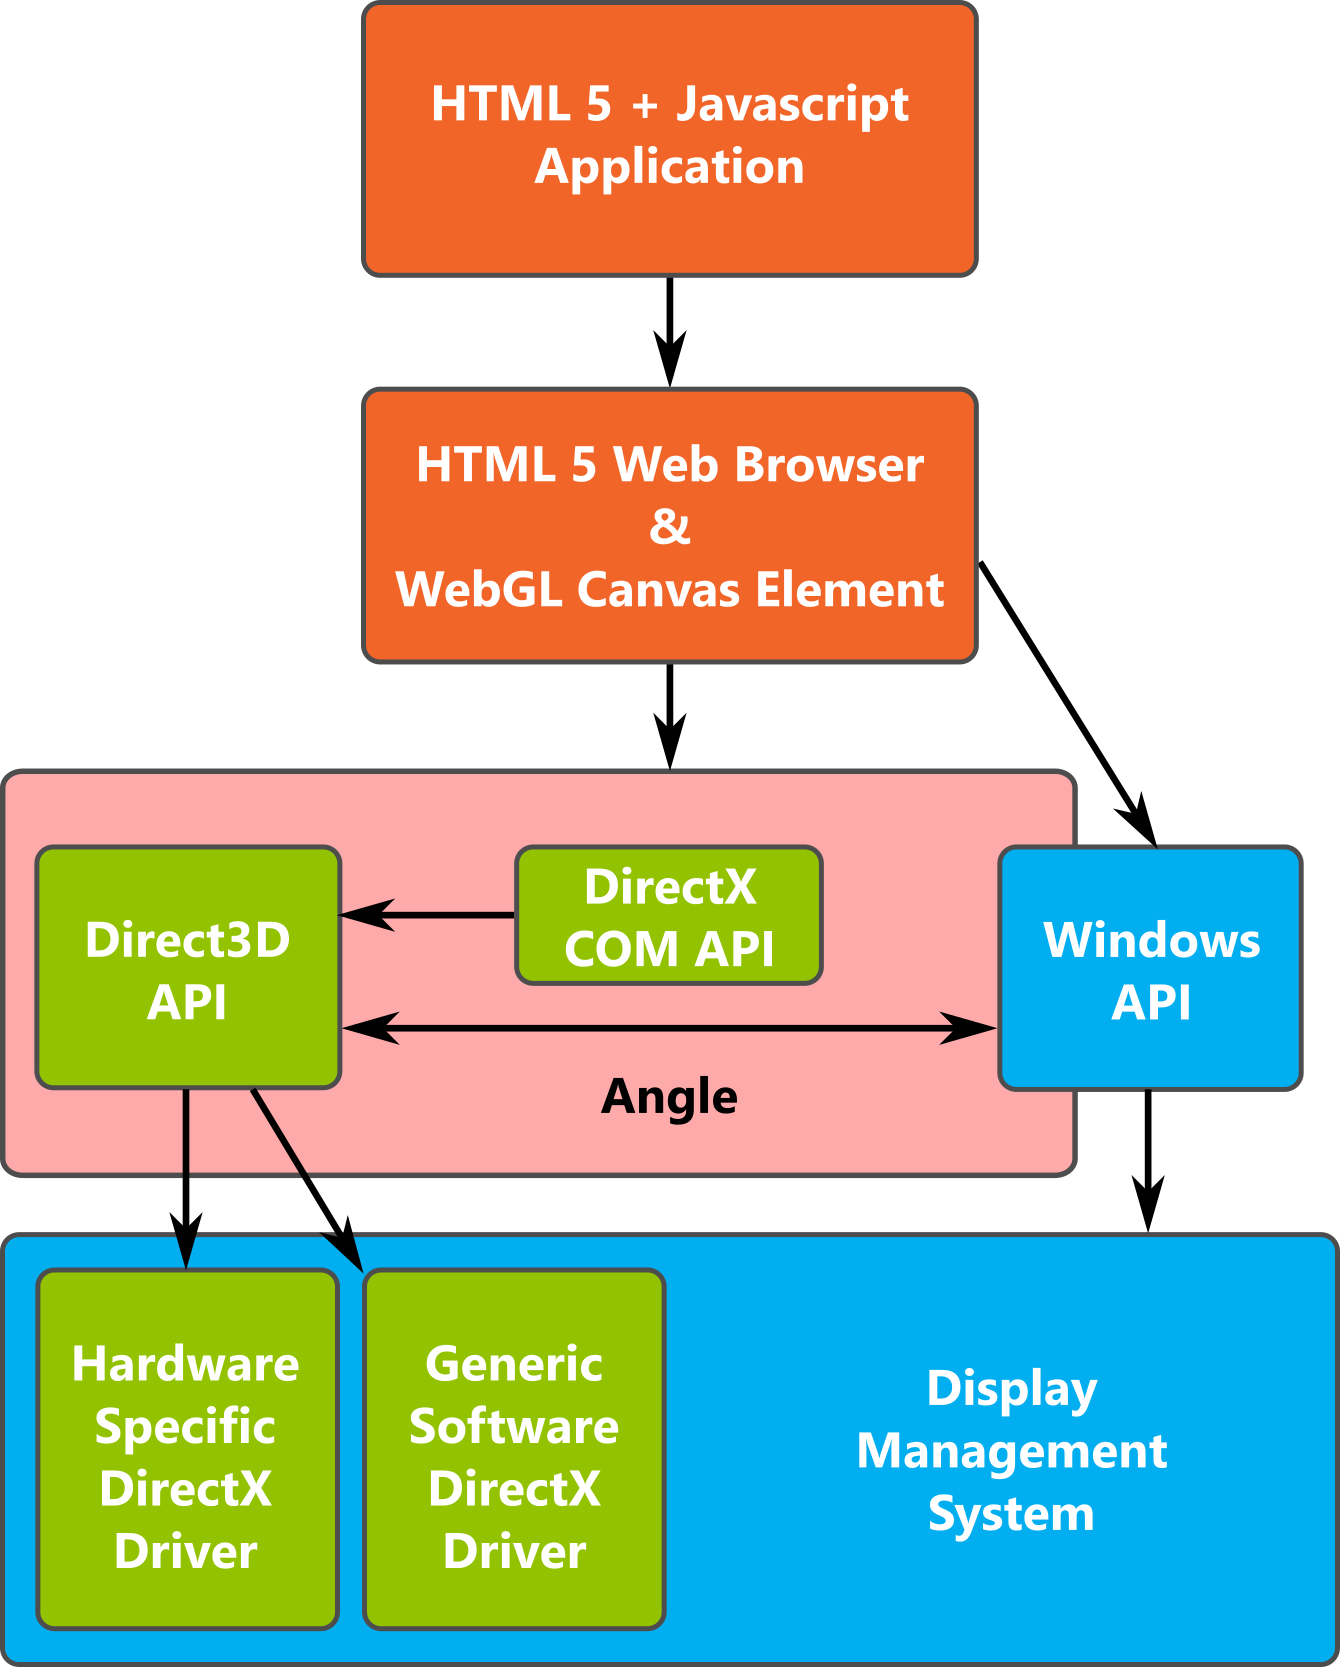
Windows WebGL Application / "OpenGL" / OS interactions. |
ANGLE's translation from WebGL to D3D is good, but not perfect. If you want a "pure" OpenGL experience on Windows, and you think your graphics drivers are up to it, learn how to disable ANGLE from the three.js developers' wiki.
Try one of the textbook's samples, or one of my experiments, to see if WebGL is working for you. If it isn't, then try following the advice in Learning WebGL Lesson 0.
We will not go into detail on exactly how everything works in this week's lab. Instead we will focus on getting to the point where you can begin drawing, then use HTML UI elements to interact with the drawing.
Object-oriented programming was developed, in part, to aid with modularising the components of Model-View-Architecture programs. Most user interface APIs are written in an Object Oriented language.
You will be structuring your programs to handle these three aspects of an interactive program. A 3D graphics:Though WebGL2 is the API of choice for this course, you will always use textbook libraries to make certain parts of the program easier to write. Follow these instructions to learn how to set up a textbook style WebGL program.
Before starting these instructions, make sure your browser is WebGL capable. I prefer Chrome for this lab, but Firefox will do. See the end of Section A for links to tests and instructions. Also, make sure you are comfortable with an HTML and Javascript source editor on your computer. If you want to start simple, I suggest TextWrangler on Mac or Notepad++ on Windows. If you choose this method, then you will have to either host your code on a real web server like Hercules, or take certain steps to allow local files to bel
Lab Editor and Code Tester:we will be using Visual Studio Code - it's what we'll be using in lab because it has the local "Live Server" extension by Ritwick Dey that lets you preview your changes with every save, and permits you to use AJAX requests to load shaders, textures and 3D models dynamically.
The HTML file for a WebGL application will link in necessary javascript files and resources. Some resources, such as shaders, can be defined in-line. The following is a commented minimal HTML file for a textbook style WebGL application:
<!DOCTYPE html>
<html>
<head>
   <title>WebGL Template</title>

   <!-- This in-line script is a vertex shader resource
      Shaders can be linked from an external file as well.
      First line must be shader language version, no spaces before.
      (Actually textbook's shader loader strips leading spaces...)
      -->
   <script id="vertex-shader" type="x-shader/x-vertex">
      #version 300 es

      // All vertex shaders require a position input.
      // The name can be changed.
      // Other inputs can be added as desired for colors and other features.
      in vec4 vPosition;

      void main()
      {
         // gl_Position is a built-in vertex shader output.
         // Its value should always be set by the vertex shader.
         // The simplest shaders just copy the position attribute straight to
         // gl_Position
         gl_Position = vPosition;
      }
   </script>

   <!-- This in-line script is a vertex shader resource
      Shaders can be linked from an external file as well.
      First line must be shader language version, no spaces before.
      (Actually textbook's shader loader strips the spaces...) -->
   <script id="fragment-shader" type="x-shader/x-fragment">
      #version 300 es

      // Sets default precision for floats.
      // Since fragment shaders have no default precision, you must either:
      //   - set a default before declaring types that use floating point OR
      //   - specify the precision before each floating point declaration
      // Choices are lowp, mediump, and highp.
      precision mediump float;

      // The output of a fragment shader is sent to draw buffers,
      // which might be an array or the screen. The default is
      out vec4 fragColor;

      void main()
      {
         // In general, the fragment shader output should be set,
         //     but this is not required.
         // If an output is not set,
         //    there will be no output to the corresponding draw buffer.
         fragColor = vec4(0.0, 0.0, 0.0, 1.0);
      }
   </script>

   <!-- These are external javascript files.
      The first three are the textbook libraries.
      The last one is your own javascript code. Make sure to change the name
      to match your javascript file. -->
   <script type="text/javascript" src="../Common/utility.js"></script>
   <script type="text/javascript" src="../Common/initShaders.js"></script>
   <script type="text/javascript" src="../Common/MVnew.js"></script>
   <script type="text/javascript" src="../Common/flatten.js"></script>
   <script type="text/javascript" src="yourWebGLJavascript.js"></script>
</head>

<body>
   <!-- This is the canvas - the only HTML element that can render WebGL
      graphics. You can have more than one WebGL canvas on a web page, but
      that gets tricky. Stick to one per page for now. -->
   <canvas id="gl-canvas" width="512" height="512">
      Oops ... your browser doesn't support the HTML5 canvas element
   </canvas>
</body>
</html>
Using your favorite editor, create a new HTML file called Lab1Demo.html in the Lab1 folder and paste the above code into it.
The javascript file will breathe life into your WebGL application. It sets up the WebGL rendering context, does the drawing and defines responses to various events. The simplest WebGL javascript program will set up the rendering context after the HTML has been loaded by defining an action for window.onload event. It can also draw if no animation is needed.
The following javascript defines a very minimalistic template WebGL program:
// This variable will store the WebGL rendering context
let gl;

window.addEventListener("load", init);
function init() {
   // Set up a WebGL Rendering Context in an HTML5 Canvas
   let canvas = document.getElementById("gl-canvas");
   gl = canvas.getContext('webgl2');
   if (!gl) alert("WebGL 2.0 isn't available");

   //  Configure WebGL
   //  eg. - set a clear color
   //      - turn on depth testing

   //  Load shaders and initialize attribute buffers
   let program = initShaders(gl, "vertex-shader", "fragment-shader");
   gl.useProgram(program);

   // Set up data to draw

   // Load the data into GPU data buffers

   // Associate shader attributes with corresponding data buffers

   // Get addresses of shader uniforms

   // Either draw as part of initialization
   //render();

   // Or draw just before the next repaint event
   //requestAnimationFrame(render);
};


function render() {
   // clear the screen
   // draw
}
Using your favorite editor, create a new javascript file called Lab1Demo.js in the Lab1 folder and paste the above code into it. Don't forget to edit the .html file so it knows about your new .js file!
Load the HTML file in your WebGL capable web browser. You will see nothing. This is the correct behaviour. Let's add the code to draw a blended colour triangle, starting with the necessary javascript, then moving to the shaders.
In this part, add or change the highlighted code in the template code.
         // This variable will store the WebGL rendering context
let gl;

window.onload = function init() {
   // Set up a WebGL Rendering Context in an HTML5 Canvas
   let canvas = document.getElementById("gl-canvas");
   gl = canvas.getContext('webgl2');
   if (!gl) alert("WebGL 2.0 isn't available");

   //  Configure WebGL
   //  eg. - set a clear color
   //      - turn on depth testing
   // This light gray clear colour will help you see your canvas
   gl.clearColor(0.9, 0.9, 0.9, 1.0);

   //  Load shaders and initialize attribute buffers
   let program = initShaders(gl, "vertex-shader", "fragment-shader");
   gl.useProgram(program);

   // Set up data to draw
   // Here, 2D vertex positions and RGB colours are loaded into arrays.
   let positions = [
         -0.5, -0.5, // point 1
         0.5, -0.5, // point 2
         0.0,  0.5   // point 2
      ];
   let colors = [
         1, 0, 0, // red
         0, 1, 0, // green
         0, 0, 1  // blue
      ];

   // Load the data into GPU data buffers
   // The vertex positions are copied into one buffer
   let vertex_buffer = gl.createBuffer();
   gl.bindBuffer(gl.ARRAY_BUFFER, vertex_buffer);
   gl.bufferData(gl.ARRAY_BUFFER, flatten(positions), gl.STATIC_DRAW);

   // The colours are copied into another buffer
   let color_buffer = gl.createBuffer();
   gl.bindBuffer(gl.ARRAY_BUFFER, color_buffer);
   gl.bufferData(gl.ARRAY_BUFFER, flatten(colors), gl.STATIC_DRAW);

   // Associate shader attributes with corresponding data buffers
   // Create a connection manager for the data, a Vertex Array Object
   // These are typically made global so you can swap what you draw in the
   //    render function.
   let triangleVAO = gl.createVertexArray();
   gl.bindVertexArray(triangleVAO);

   //Here we prepare the "vPosition" shader attribute entry point to
   //receive 2D float vertex positions from the vertex buffer
   let vPosition = gl.getAttribLocation(program, "vPosition");
   gl.bindBuffer(gl.ARRAY_BUFFER, vertex_buffer);
   gl.vertexAttribPointer(vPosition, 2, gl.FLOAT, false, 0, 0);
   gl.enableVertexAttribArray(vPosition);

   //Here we prepare the "vColor" shader attribute entry point to
   //receive RGB float colours from the colour buffer
   let vColor = gl.getAttribLocation(program, "vColor");
   gl.bindBuffer(gl.ARRAY_BUFFER, color_buffer);
   gl.vertexAttribPointer(vColor, 3, gl.FLOAT, false, 0, 0);
   gl.enableVertexAttribArray(vColor);


   // Get addresses of shader uniforms
   // None in this program...

   //Either draw once as part of initialization
  render();

   //Or schedule a draw just before the next repaint event
   //requestAnimationFrame(render);
};


function render() {
   // clear the screen
   // Actually, the  WebGL automatically clears the screen before drawing.
   // This command will clear the screen to the clear color instead of white.
   gl.clear(gl.COLOR_BUFFER_BIT);

   // draw
   // Draw the data from the buffers currently associated with shader variables
   // Our triangle has three vertices that start at the beginning of the buffer.
   gl.drawArrays(gl.TRIANGLES, 0, 3);
}
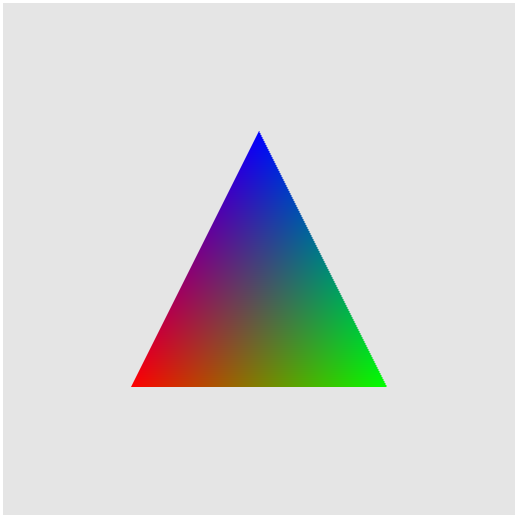
Reload the HTML page. The result should look like this:

What your project should look like. If you see nothing and you are sure you copy/pasted everything correctly, make sure your HTML is referencing your javascript file instead of the template's dummy one.
Now we're getting somewhere. The reason the triangle is black is that the shaders in the HTML file are hardcoded to paint everything black. Check your web browser's error console. Your WebGL object may have reported errors when you called vertexAttribPointer() and enableVertexAttribArray() with the invalid vColor returned by getAttribLocation(). We need to modify the shaders to make them aware of the colour buffer. Make the following changes to the vertex and fragment shaders:
      #version 300 es

      // All vertex shaders require a position input.
      // The name can be changed.
      // Other inputs can be added as desired for colors and other features.
      in vec4 vPosition;
      in vec4 vColor;

      // This varying output is interpolated between the vertices in the
      // primitive we are drawing before being sent to an input with
      // matching name and type in the fragment shader
      out vec4 varColor;

      void main()
      {
         // gl_Position is a built-in vertex shader output.
         // Its value should always be set by the vertex shader.
         // The simplest shaders just copy the position attribute straight to
         // gl_Position
         gl_Position = vPosition;
         varColor = vColor;
      }
         #version 300 es

         // Sets default precision for floats.
         // Since fragment shaders have no default precision, you must either:
         //   - set a default before declaring types that use floating point OR
         //   - specify the precision before each floating point declaration
         // Choices are lowp, mediump, and highp.
         precision mediump float;

         in vec4 varColor;
         // The output of a fragment shader is sent to draw buffers,
         // which might be an array or the screen. The default is
         out vec4 fragColor;

         void main()
         {
            // In general, the fragment shader output should be set,
            //     but this is not required.
            // If an output is not set,
            //    there will be no output to the corresponding draw buffer.
            fragColor = varColor;
        }
Much more colourful. Yay!
Click here to see a page with the working WebGL result instead of a picture.
The triangle is OK, but you probably want Real 3D Graphcs. Let's do that. I do not expect you to understand everything that's going on here, but you should be able to understand enough to use this as the basis for your exercise this week.
#version 300 es
in  vec4 vPosition;
in  vec4 vNormal;
in vec3 vColor;

uniform mat4 p;
uniform mat4 mv;
uniform vec4 lightPosition;

out vec4 varColor;

float shininess;
vec4 ambientProduct;
vec4 diffuseProduct;
vec4 specularProduct;
vec4 mvPosition;
mat4 t_mv, t_p;

void main()
{
   //initialize variables
   shininess = 5.0;
   ambientProduct = vec4(0.2 * vColor, 1);
   diffuseProduct = vec4(0.8 * vColor,1);
   specularProduct = vec4(0.3);

   //Transform the point
   t_mv = transpose(mv);
   t_p = transpose(p);
   mvPosition = t_mv*vPosition;
   gl_Position = t_p*mvPosition;

   //Set up Normal, Light, Eye and Half vectors
   vec3 N = normalize((t_mv*vNormal).xyz);
   vec3 L = normalize(lightPosition.xyz - mvPosition.xyz);
   if (lightPosition.w == 0.0) L = normalize(lightPosition.xyz);
   vec3 E = -normalize(mvPosition.xyz);
   vec3 H = normalize(L+E);

   //Calculate diffuse coefficient
   float Kd = max(dot(L,N), 0.0);

   //Calculate Blinn-Phong specular coefficient
   float Ks = pow(max(dot(N,H), 0.0), shininess);

   //Calculate lit colour for this pixel
   varColor =  Kd * diffuseProduct + Ks * specularProduct + ambientProduct;
}
//WebGL State Management
////////////////////////
let mvIndex; //Shader Positioning Input
let projIndex; //Shader Projection Input
let mv; //Local Positioning Matrix
let p; //Local Projection Matrix

let colors = {
  'red':     new vec4(1, 0, 0, 1),
  'blue':    new vec4(0, 0, 1, 1),
  'green':   new vec4(0, 1, 0, 1),
  'yellow':  new vec4(1, 1, 0, 1),
  'cyan':    new vec4(0, 1, 1, 1),
  'magenta': new vec4(1, 0, 1, 1),
};

//Model Control Variables
/////////////////////////
let objectColor = colors['red']; //current color of sphere
let rotAngle = 0; //current rotation angle of scene
let rotChange = -0.5; //speed and direction of scene rotation
   // Set up a WebGL Rendering Context in an HTML5 Canvas
   let canvas = document.getElementById("gl-canvas");
   gl = canvas.getContext('webgl2');
   if (!gl) alert("WebGL 2.0 isn't available");

   //  Configure WebGL
   //  eg. - set a clear color
   //      - turn on depth testing
   // This light gray clear colour will help you see your canvas
   gl.clearColor(0.9, 0.9, 0.9, 1.0);
   gl.enable(gl.DEPTH_TEST);

   //  Load shaders and initialize attribute buffers
   let program = initShaders(gl, "vertex-shader", "fragment-shader");
   gl.useProgram(program);

   // Get locations of transformation matrices from shader
   mvIndex = gl.getUniformLocation(program, "mv");
   projIndex = gl.getUniformLocation(program, "p");

   // Send a perspective transformation to the shader
   let p = perspective(50.0, canvas.width/canvas.height, 0.5, 50.0);
   gl.uniformMatrix4fv(projIndex, gl.FALSE, flatten4x4(p));

   // Get locations of lighting uniforms from shader
   let uLightPosition = gl.getUniformLocation(program, "lightPosition");

   // Set default light direction in shader.
   gl.uniform4f(uLightPosition, 0.0, 0.0, 1.0, 0.0);

   // Configure uofrGraphics object
   urgl = new uofrGraphics(gl);
   urgl.connectShader(program, "vPosition", "vNormal", "vColor");

   // Begin an animation sequence
   requestAnimationFrame(render);
   // Clear the canvas with the clear color instead of plain white,
   // and also clear the depth buffer
   gl.clear(gl.COLOR_BUFFER_BIT | gl.DEPTH_BUFFER_BIT);

   // Draw previous model state
   // Notice we modularized the work a bit...
   PreRenderScene();
   RenderStockScene();
   RenderScene();

   // Update the model and request a new animation frame
   rotAngle += rotChange;
   requestAnimationFrame(render);
// Use this to perform view transforms or other tasks
// that will affect both stock scene and detail scene
function PreRenderScene() {
   // select a default viewing transformation
   // of a 20 degree rotation about the X axis
   // then a -5 unit transformation along Z
   mv = mat4();
   mv = mult(mv, translate(0.0, 0.0, -5.0));
   mv = mult(mv, rotate(-20.0, vec3(1, 0, 0)));

   //Allow variable controlled rotation around local y axis.
   mv = mult(mv, rotate(rotAngle, vec3(0, 1, 0)));
}

// Function: RenderStockScene
// Purpose:
//     Draw a stock scene that looks like a
//     black and white checkerboard
function RenderStockScene() {
   let delta = 0.5;

   // define four vertices that make up a square.
   let v1 = vec4(0.0, 0.0, 0.0, 1.0);
   let v2 = vec4(0.0, 0.0, delta, 1.0);
   let v3 = vec4(delta, 0.0, delta, 1.0);
   let v4 = vec4(delta, 0.0, 0.0, 1.0);


   let color = 0;

   // define the two colors
   let color1 = vec4(0.9, 0.9, 0.9, 1);
   let color2 = vec4(0.05, 0.05, 0.05, 1);

   //Make a checkerboard
   let placementX = mv;
   let placementZ;
   placementX = mult(placementX, translate(-10.0 * delta, 0.0, -10.0 * delta));
   for (let x = -10; x <= 10; x++)
   {
      placementZ = placementX;
      for (let z = -10; z <= 10; z++)
      {
         urgl.setDrawColour((color++) % 2 ? color1 : color2);
         gl.uniformMatrix4fv(mvIndex, gl.FALSE, flatten4x4(placementZ));
         urgl.drawQuad(v1, v2, v3, v4);
         placementZ = mult(placementZ, translate(0.0, 0.0, delta));
      }
      placementX = mult(placementX, translate(delta, 0.0, 0.0));

   }
}

// Function: RenderScene
// Purpose:
//     Your playground. Code additional scene details here.
function RenderScene() {

   //////
   //Draw a cube "base"
   //    TODO 1: give the cube a side length of .5
   //            and put it exactly on the checkerboard

   // Create the a translation transformation.
   // Translate's 3 arguments are x, y and z.
   // At this point, positive y points up from checkerboard

   //    TODO 1b: adjust the translation so the cube is on top of the checkerboard
   //             HINT: what's half the cube's side length?
   mv = mult(mv, translate(0.0, 0.0, 0.0));

   //Send the transformation matrix to the shader
   gl.uniformMatrix4fv(mvIndex, gl.FALSE, flatten(mv));

   // set the drawing color to light blue
   // arguments to vec4 are red, green, blue and alpha (transparancy)
   urgl.setDrawColour(vec4(0.5, 0.5, 1.0, 1.0));

   // Draw the cube with urgl.drawSolidCube
   // Argument "size" refers to the side length of the cube
   // Cube is centered around current origin

   //    TODO 1a: change the cube's side length to .5
   urgl.drawSolidCube(1.0);


   ///////
   // Draw a Sphere:
   //    TODO 2: place sphere exactly on top of the box
   //            change the sphere to a wire sphere to see the poles
   //            uncomment the rotate to see the effect

   // Set the drawing color to the one from the menu
   urgl.setDrawColour(objectColor);

   // Move the "drawing space" up by the sphere's radius
   // so the sphere is on top of the checkerboard
   // mv is a transformation matrix. It accumulates transformations through
   // right side matrix multiplication.

   //    TODO 2a: use the translation to put the sphere on top of the box
   //             HINT: radius of sphere + half side length of the cube...
   mv = mult(mv, translate(0.0, 0.5, 0.0));

   // Rotate drawing space by 90 degrees around X so the sphere's poles
   // are vertical. Arguments are angle in degrees,
   // and a three part rotation axis with x, y and z components.
   // after this rotation the Z axis is up instead of the Y axis

   //    TODO 2c: uncomment this rotate
   //mv = mult(mv, rotate(90.0, vec3(1, 0, 0)));

   //Send the transformation matrix to the shader
   gl.uniformMatrix4fv(mvIndex, gl.FALSE, flatten(mv));

   // Draw a sphere with urgl.drawSolidSphere
   // Arguments are Radius, Slices, Stacks
   // Sphere is centered around current origin.
   //    TODO 2b: Change to drawWireSphere so you can see the sphere's poles
   urgl.drawSolidSphere(0.5, 40, 40);


   ///////
   // Draw a Torus
   //    TODO 3: tilt the torus by 10 degrees and make it fit the sphere snugly

   // Change the draw color to cyan (see the colors object at start of code)
   urgl.setDrawColour(colors.cyan);

   //    TODO 3a: add a rotation here like the one for the sphere
   //             and change the angle to 10 degrees


   //    TODO 3b: send the transformation matrix to the shader


   // Draw a torus with urgl.drawSolidTorus
   //
   // Arguments are:
   //    - iradius: Inner Radius (radius of the torus "tube")
   //    - oradius: Outer Radius (radius of the center of torus "ring")
   //    - nsides: sides around one segment or ring of the torus
   //    - nrings: number of rings around the torus

   //    TODO 3c: adjust the oradius so the ring fits the sphere exactly
   //             HINT: how much bigger than the sphere does oradius need to be
   //                   so that iradius will just touch it?
   urgl.drawSolidTorus(0.1, 1.0, 40, 40);
}
case 2: of function vec4()... ): Alex's patched
MVnew.js
    <br />
    <select id="colorMenu" >
      <option value="red">red</option>
      <option value="blue">blue</option>
      <option value="green">green</option>
      <option value="yellow">yellow</option>
      <option value="cyan">cyan</option>
      <option value="magenta">magenta</option>
    </select>
      // You can't work with HTML elements until the page is loaded,
   // So init is a good place to set up event listeners
   setupEventListeners();
function setupEventListeners()
{
  //Request an HTML element
  let m = document.getElementById("colorMenu");

  //Setup a listener - notice we are defining a function from inside a function
  //The textbook recommends click, but I find that change works better
  m.addEventListener("change", function(event) {
       //acquire the menu entry number
       let index = m.selectedIndex;

       //learn the value of the selected option. This need not match the text...
       let colorName = m.options[index].value;

       //change the object color by looking up the value in our associate array
       objectColor = colors[colorName];
    });
}
If your result looks and works like this, congratulations!
You are now ready to begin the exercise.
Good luck!
If your program runs correctly, you might be wondering how exactly the picture is drawn. That is, you might want to understand how each function works. Well, you do not have to worry too much about this in the first lab. Over the rest of the semester we will go through these subjects one-by-one in detail. Of course, we will learn some even more advanced functions and features too.
To be completed and submitted to URCourses by the start of your next lab seminar.
Try to make to the RenderScene function by following the TODOs in the comments. This is a taste of things to come. For help with the function calls read the comments carefully and consult with your lab instructor.
Your result should look like this... you may add other objects to the scene if you wish, but please keep the blue cube and red sphere visible.
You have seen a lot of stuff so far and you may be confused about all the libraries used in this lab's program. Take a moment to learn about them.