Buttons are a simple way to communicate with your Arduino. They can indicate to your Arduino whether or not they are being pressed. This information can be remembered and used to make decisions in Arduino programming language that can affect a circuit's behaviour in many ways.
In the lab lecture, you will see how to use one button to control a led directly, to adjust the brightness of a LED, and to count slowly while the button is pressed. In the exercise, you will connect a second button and use the two to make a light switch.
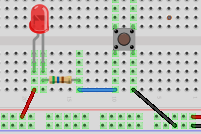
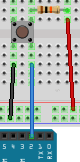
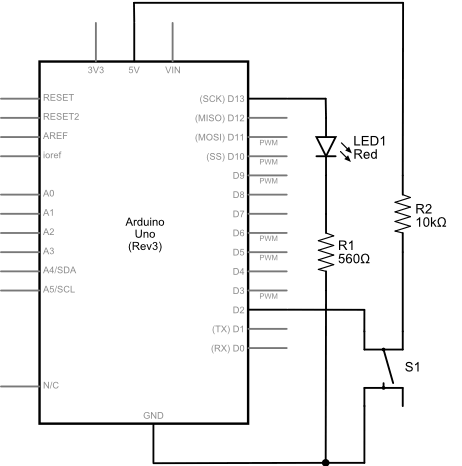
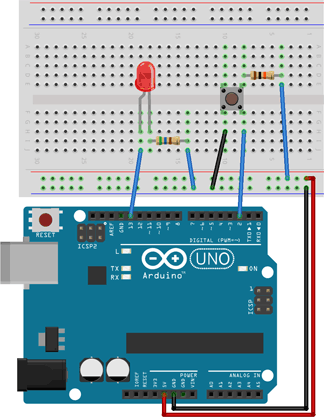
You should assemble the following circuit and run the sample program on it before coming to lab this week. You will know you got everything right if pushing the button turns the light off.
|
|
We will start with code provided by the Arduino programming environment. Use the following program:
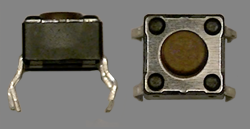
There are two pushbuttons in your kit. They look a bit like this:
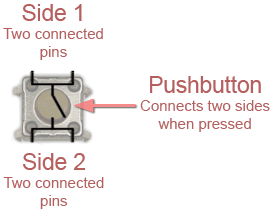
Each button has four pins. If you look carefully you will notice that they are slightly bent. Your button has two sides and the shape of the pins tells you where the sides are - pins that bend away from each other are connected. When you push the button, the two sides will be connected and current can flow across the button. The schematic representation of a pushbutton tries to show this:
If you don't need to do something complex, then you can put the pushbutton directly into a circuit so that pushing it completes it like so:
But this doesn't let us do anything fancy or clever with the button. For that you want to connect the button to the Arduino and let it do the thinking.
Arduino inputs only measure voltage. Connecting to a digital or analog input on the Arduino will not affect your circuit. They do not draw or provide any meaningful amount of power.
In the First Build circuit, the button is connected to digital pin 2
but any of the digital pins, 0 to 13, or any of the analog pins, A0 to
A5, can be used for digital input. Digital input pins will tell you if
the voltage they are connected to is close to +5V (HIGH) or to 0V (LOW). Those
are the only two possibilities when you read from the digital pins. They can't tell what the
value is exactly. This is perfect for a button that can only have two
states - up or down.
Some input devices can provide a range of voltages that may correspond to temperature or a position on a dial. To read these values you must use the analog inputs. We will look into analog input next week.
Correctly connecting a button to the Arduino takes a bit of work. You need to set up a pull-down or pull-up circuit so that the Arduino has a dependable voltage to sense when the button isn't pressed.
In the First Build circuit, the button is connected to the Arduino and it works, so it must be one of these, but which? Take a look at the button part of the breadboard.
This circuit is connected to the Arduino on the +5V side of the button. This is a pull-up configuration — when the button is not pressed, the Arduino will sense high voltage. Notice that pin 2 is connected after the resistor. The electricity has nowhere to go after the resistor because pin 2 draws no current — it only measures pressure. With the button up it will measure a pressure of +5V or high pressure.
The other side of the button is connected to ground. When we push the button, the pressure will be relieved on the ground side of the resistor. Pin 2 is connected to the ground side and will read low pressure or 0V.
If Pin 2 were connected to the +5V side of the resistor in this circuit, it would read +5V even when the button is pressed. This is because the resistor slows the flow of electricity in the circuit and pressure builds up on the +5V side of the resistor faster than it can escape. So the resistor serves an important purpose — it helps create a measurable voltage drop.
The resistor in this circuit serves a second purpose - it prevents your button from drawing too much power from your power source when it is pressed. Using a weak resistor or no resistor at all can be very bad.
If your Arduino is connected to a USB power source the consequence probably won't be too severe. What is most likely to happen is that your Arduino will shut down when you push the button. When you release the button it may do weird things like lock up or reset. If it locks up just remove the power supply, fix the circuit, reconnect the power supply and press the reset button.
If you are attached to something more potent like an AC adapter you may generate a lot of heat, drain your battery, cause your battery to leak, or break your AC adapter.
A pull-down button circuit is very similar to a pull-up circuit. All you have to do is switch the +5V and ground wires.
This week's example uses both variables and constants.
A variable is a
symbolic value that can change while a sketch is running. You make one
- called defining a variable - by stating what type of value the
variable can represent, then giving it a name. Optionally, you can give
a variable an initial value. In this week's program buttonState is an example of a variable. Here is buttonState's definition:
// variables will change:
int buttonState = 0;         // variable for reading the pushbutton status
Its type is int meaning integer,
or whole number. On the Arduino integers can have whole number values
between -32,768 and 32,767. It has been initialized to the value 0.
This value will change before you ever try to use the buttonState variable, so you could get rid of the initial value. Give it a try.
The buttonState variable exists to record whether or not the button
in the circuit is currently pushed. You usually change the value of
variables by making an assignment - by setting it equal to some other
value. In an assignment statement you write code that says this variable is assigned that value. That value can be a simple number or something more complicated like a mathematical equation. In this week's example we set buttonState to the state of the buttonPin like this:
  // read the state of the pushbutton value:
  buttonState = digitalRead(buttonPin);//buttonState is assigned the state of buttonPin
A constant is a
symbolic value that never changes while a sketch is running. They are
used when you want to refer to something in a program by it's meaning
rather than by a seemingly arbitrary value. In this week's lab the
button and LED pins do not change once the program starts, so they are
defined as constant using the keyword const like this:
// constants won't change. They're used here to
// set pin numbers:
const int buttonPin = 2;     // the number of the pushbutton pin
const int ledPin =  13;      // the number of the LED pin
In last week's lab there were several values that should have been
constants, like the pin number of the LED and relative timings of Morse
Code signals. The basic unit of time, uTime, could also
have been a constant in the simpler challenges, but the varying speed
challenge would have required it to be a variable.
All the examples of constants and variables thus far have been of type int. There are other types too. Some will be demonstrated and explained in future labs. The curious can check out the full list in the Data Types section of the Arduino language reference.
For your Arduino sketch to read values from a digital input pin you need to do two things:
pinMode command, usually in the setup() procedure :
void setup()
{
    // ... do some setup things

    pinMode( inputPin, INPUT );

    // ... do more setup things
}
Take a look at how the pinMode command is used in this week's sample program. digitalRead command as shown in the variable section of the notes..digitalRead command takes one argument, and results in a symbolic value of HIGH (for +5V) or LOW (for 0V).digitalRead
can be used directly in an if/else statement or they can be remembered
for later use. We will look at an example of each in the next two
sections.
Once it has read the value of an input pin, it has to decide what to do with the result. The mechanism for making decisions in a program is the if/else statement. In its most general form it looks like this:
    if ( boolean_expression )
    {
        // stuff to do if boolean_expression is true
    }
    else
    {
        // stuff to do if boolean_expression if false
    }
The boolean_expression usually takes the form of a comparison of two values. For example, this week's sample sketch reads pin 2 into the variable buttonState and checks to see if the result is HIGH:
  // read the state of the pushbutton value:
  buttonState = digitalRead(buttonPin);

  // check if the pushbutton is pressed.
  // if it is, the buttonState is HIGH:
  if (buttonState == HIGH) {
      // turn LED on:
      digitalWrite(ledPin, HIGH);
  }
  else {
      // turn LED off:
      digitalWrite(ledPin, LOW);
  }
This code says: "Get the button's reading. Is the button's reading equal to HIGH? If it is, turn the LED on. If not, turn the LED off." Because the loop()
procedure repeats continuously and our program does nothing else to
interfere with checking the button, the LED's state will change quickly
to follow this rule.
In this example we use the == or equals comparison operator. The result of any comparison is a boolean value of true or false. Other comparison operators you can use are:
  Comparison Operators
  C++ Symbol   Description    ==         equal to

    !=         not equal to

    >          greater than

    <          less than

    >=         greater than or equal to

    <=         less than or equal to
The result of a comparison is a boolean value of true or false. They are the simplest form of boolean expression.
==, is easily confused with the assignment operator, =
falsetrueIn a program as simple as this one, we don't need to use a variable to remember the state of the button. Instead we can read the button it directly in the if statement like this:
  if (digitalRead(buttonPin) == HIGH) {
      // turn LED on:
      digitalWrite(ledPin, HIGH);
  }
  else {
      // turn LED off:
      digitalWrite(ledPin, LOW);
  }
It should work exactly the same as before.
When you start this sketch, the light is on and it turns off when you hold the button. Why is this? What if you wanted the opposite behaviour? What can you change to make the light default to off and turn on only while the button is pressed? There are three possibilities:
HIGH. If you rewire it to be a pull-down button that would solve the problem.
This is a hardware solution. Software is almost always easier to change than hardware.HIGH, turn it on when does not read HIGH:
  if (digitalRead(buttonPin) != HIGH) {
      // turn LED on:
      digitalWrite(ledPin, HIGH);
  }
  else {
      // turn LED off:
      digitalWrite(ledPin, LOW);
}HIGH, turn it on when it reads LOW:
  if (digitalRead(buttonPin) == LOW) {
      // turn LED on:
      digitalWrite(ledPin, HIGH);
  }
  else {
      // turn LED off:
      digitalWrite(ledPin, LOW);
}Here is an example that uses one button to set your LED to different brightnesses. To use it, move your LED to pin 9.
  /*
 Dimmer-Button
 Written Aug 2011 by Alex Clarke

 Uses button presses to switch an LED between off, dim, medium, and high brightness.
 */

// constants for this sketch
const int buttonPin = 2;       // pushbutton pin
const int led =  9;            // LED  pin

// variables for this sketch
int ledMode = 1;         // variable for recording button presses

void setup()
{
    // initialize the output pins:
    pinMode(led, OUTPUT);

    // initialize the pushbutton pin as an input:
    pinMode(buttonPin, INPUT);
}

void loop()
{
    // check if the pushbutton is pressed.
    if (digitalRead(buttonPin) == LOW)
    {
        // if it is, count a press
        ledMode = ledMode + 1;

        // if we've counted to an invalid mode
        if (ledMode == 5)
        {
            // reset to mode 1
            ledMode = 1;
        }
    }

    // Detect the current mode and set the LED appropriately
    if (ledMode == 1)
    {
        //Mode 1 - LED is off
        digitalWrite(led, LOW);
    }
    else if (ledMode == 2)
    {
        //Mode 2 - LED is dim
        analogWrite(led, 64);
    }
    else if (ledMode == 3)
    {
        //Mode 3 - LED is medium
        analogWrite(led, 128);
    }
    else
    {
        //Mode 4 - LED is bright
        digitalWrite(led, HIGH);
    }

}
This code uses buttonPresses to remember how many times
the button was pushed — sort-of. What it actually does is count up by
one every time it notices that the button is down. The loop()
procedure runs very fast and it will check the button thousands of
times a second. No matter how fast you push the button, the LED will
end up at a random brightness. One way to fix this is to add a delay at the end of the loop() procedure. Starting with a hunch based on cognitive psychology,
I determined that a 200 millisecond delay worked best for me.
This is not a perfect fix — if you hold the button the light will cycle
between brightnesses — but it's an improvement.
Notice the new if/else forms used in this example:
else part of an if/else is optional. There are two ifs that have no matching else.if/else statements can be nested inside other if or else statements. The first if in this example has another if nested inside.if/else if/else sequence. Often a program will need to list mutually exclusive options — only one of the options should be chosen by the program. This special form of if/else makes this easier to read and write such a list of options. The example in the lab notes is equivalent to the following nested if/else statements:
    // Detect the current mode and set the LED appropriately
    if (ledMode == 1)
    {
        //Mode 1 - LED is off
        digitalWrite(led, LOW);
    }
    else
    {
        if (ledMode == 2)
        {
            //Mode 2 - LED is dim
            analogWrite(led, 64);
        }
        else
        {
            if (ledMode == 3)
            {
                //Mode 3 - LED is medium
                analogWrite(led, 128);
            }
            else
            {
                //Mode 4 - LED is bright
                digitalWrite(led, HIGH);
            }
        }
    }
Sometimes you need to combine one boolean expression with another or flip its value. This is done with boolean operators:
  Boolean Operators
  C++ Symbol   Description    &&         AND - goes between two boolean expressions: (expr1) && (expr2)
               If both sides are true, the result is true.
               Otherwise the result is false.

    ||         OR - goes between two boolean expressions: (expr1) || (expr2)
               If both sides are false, the result is false.
               Otherwise the result is true.

    !          NOT - comes before a boolean expression:  !(expr)
               true becomes false
               false becomes true
You will learn how to use logical operators by example as the semester progresses. To see the || operator in action, check out the following Arduino sample sketch:
Make sure you have an LED connected to pin 9 if you want to try this sketch.
Complete the Circuit Bending quiz in URCourses. Results and correct answers will be released for review when the quiz closes.
Please click here if you want to try a lab related challenges for a bonus mark. Select a difficulty level that is appropriate to your programming skill.
During the lab:
In URCourses before next lab:
(Optional):