- VS Code
- "Unix" Commands
- Compiling
- (Optional) "ssh" @ Home
- (Optional) Transferring files @ Home
What is VS Code?
Visual Studio Code (commonly called VS Code) is a free-to-download editor available for multiple platforms (Mac, Linux, Windows) that allows you to write code in various languages, such as HTML, C++, Python, and more. You can download extensions that enhance its functionality, such as enabling coding on a remote platform or providing easy code completion. We will be using VS Code to program in C++ this semester.
You will be working on your machine but remotely accessing our CS Managed server called "langs" to compile and run the code
Things that you will need to do:
- Download and install VS Code using this link: https://code.visualstudio.com/
- Activate your CS Account using this link: https://services.cs.uregina.ca/
- See URCourses for a list of instructional videos

VS Code is divided into several parts. For more of a description, check out the documentation on VS Code's user interface: https://code.visualstudio.com/docs/getstarted/userinterface
There are four main parts that we will use in the first lab:
- the set of icons on the left (called the Activity Bar). We will use it for adding extensions, remotely connecting to the CS Servers, and opening our remote folders
- the left panel (called the Primary side Bar) changes, but can be used to show your files
- the upper right panel or group of panels (called the Editor Groups) shows your code
- the lower right panel (called Panel) shows your terminal (please switch to the "TERMINAL" tab and ensure that you are on "langs" to compile, run, and use UNIX commands)
We will be compiling and running code on "langs". Please see URCourses for a link to videos.
Explore Commands
Now that you are familiar with the menus and the things that make Linux "pretty". We can explore the roots of Unix/Linux--the commands that you type.
Once you have a terminal, you can explore the following commands. You can use ls or pwd after the command to help you discover what the comands do:
|
|
|
|
|
|
Commands to Work with a File Called newfile
|
|
|
Commands for Viewing a File
|
|
|
With more and less explore the following:
- What happens when you press the space bar?
- What happens when you press enter?
- What happens when you type the following:
/nova/? - What happens when you press the letter q?
- Why would you want to use
moreorlessinstead ofcat?
Unix References
- You can put these commands into a script and run them. It is like learning a language in itself. If you are interested, look up "shell script" on the internet.
- In various situations, you may only have a command line to work with. Try the key sequence Alt Ctrl F2. To get out use "exit"
- If you are working from home on Unix/Linux you will be typing commands rather than accessing Linux menus
Remember, you always feel most comfortable with the things that you are used to. How can you feel more comfortable with these commands? Practice! Practice! Practice!
We will provide more details of compiling files in a later lab. For now, let's learn by example:
Compiling Code with Errors
Let's work with partially completed code for this week's exercise.
- Compile:
g++ lab1Grocery.cpp -o output- You will see several error messages. Focus on fixing the top problem first.
- Look for the number between the colon (":") character that is the line number where the error appears
- Fix the code, save, and compile until no messages appear
- You can now run the code
./output
Explore:
- Try playing around with the order of the arguments after the
g++in Step 2- If something happens to your hello.cpp code, don't worry--you can always get it again (from Step 1)
- If something happens to your hello.cpp code, don't worry--you can always get it again (from Step 1)
- Try leaving out the
-o outputin Step 1. What is produced? Can you use that to run the code?
- Try replacing
outputwithtest. Try to runtestwith or without the./in front. Doesoutputwork that way too? If you are curious about why, look up: unix command test
Compiling Multiple Files
- Compile two
.cppfiles. For example:g++ -c main.cppg++ -c myFunction.cpp
- What two files are created? These are refered to as object files and contain the machine code
- Now, the two object files need to be "linked" or combined together into the "executable" (in other words, the file that will be run)
g++ main.o myFunction.o -o main
- You can now run the code. What will you type?

An Alternative to VS Code to access langs
If you want to work with these files at home (ie. compile an run from a terminal), you can use:
ssh your_cs_username@titan.cs.uregina.caand then
ssh langs
You will type this command in a "terminal":
- On a Mac, you can find the terminal by using spotlight to search for "terminal"
- On Windows, you can find the terminal by searching for "cmd"
Transferring Files Between Your Home PC and CS Managed Account
If you want to transfer or edit files on the lab machines from anywhere else in the world, you can use FileZilla on Windows, Mac and Linux.
- Get FileZilla: Official Download Site
- If you need FileZilla on a Windows computer but you don't have admin rights, use the .zip file without installer and run FileZilla.exe
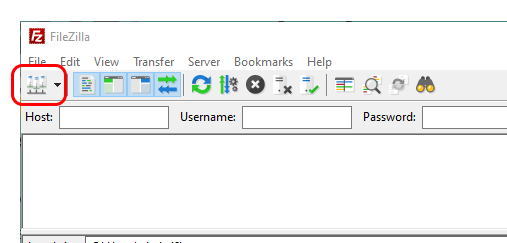
Set up your Titan site details by clicking on the Site Manager button
Then follow the numbered steps to create a Titan site entry:
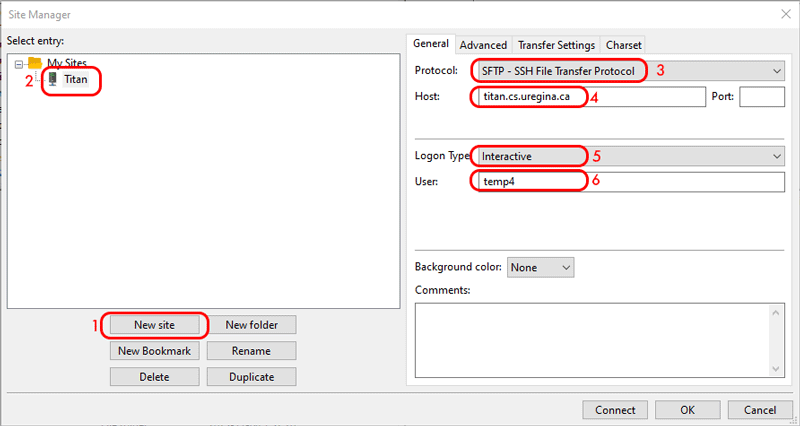
- Click New site
- Name the site something you'll recognize, like Titan
- Change the Protocol to SFTP
- Set the Host to titan.cs.uregina.ca
- Change the Logon Type to Interactive
- If you are the only user put in your user name. Otherwise leave it blank.
Click OK to save, or click Connect to connect. You'll have to enter your password.
To connect in the future, click the Site Manager, click your site, and click connect - or click the arrow next to the Site Manager icon and select the site you want from the list.
Once connected, you can navigate through your remote files on the right. You can drag and drop local files there to send them to the CS server. You can edit files by right clicking them and choosing edit. The default editor is very basic. You might want to set a custom editor like Visual Studio Code. When you save your file, you will have to click on FileZilla and let it send your changes to the server.
Visual Studio Code can also be configured to allow more seamless editing of files.